Tag: Climbing

Outdoor Climbing Coaching

Recently the demand for outdoor sport climbing coaching has increased hugely. Due to the amount  of Performance Coaching Courses I have run I notice some patterns in the way climbers tend to move. Much of this might be down to the way we as humans naturally move on rock. It’s also possible that the nature of artificial climbing is playing a large part in forcing people into a pattern of movement that is at odds with the way you would ideally want to move on rock.

Having been a climbing instructor for over 30 years it seems that much has changed. Both physically and in the way people move. Clients are generally fitter and stronger, the grade they climb is generally higher than it used to be, but the gap between the grade people climb indoors compared to outdoors seems to be widening. What I find most interesting is seeing a well-established pattern of movement which is very similar from one climber to the next. Before climbing walls became popular, as a guide, you would most likely be introducing someone to climbing for the first time and they would therefore try to execute the moves and techniques that you explained as best as they could. These days however, the average client has already been climbing indoors for about two years and has a well-established pattern of movement.

When modern climbing gyms appeared on the scene in the early 1990’s they were very much seen as a place for climbers to train, build and maintain fitness during times of poor weather and the long dark winter months. But how well do they work nowadays for the new climber looking to progress outdoors?


The pattern of movement that climbing on artificial walls is likely to produce  

Climbing indoors likely develops a pattern of movement that is best described as: a high, often wide step (anything above the opposite knee is a good indication of what might be considered high), very little sideways movement of the hips if any, then pull on the arms before rocking over the high foot. This move is usually executed with a trailing back leg (a heavy limb weighing you down as you try to move up). This is about as inefficient a move as you can make.

Of course there comes a time when a high step rock over is necessary. However, if we are just doing so out of habit and missing the easier options when available we are unnecessarily wasting valuable upper body strength.


What makes us more likely to establish this pattern of movement when climbing indoors?

The limited options of foot placements on an indoor wall compared to rock as well as the difficulty in smearing on indoor routes can greatly reduce the opportunity to practice and develop basic non-technical movement skills. That is, if we choose to climbing the routes as they are set. In order to establish an efficient way of moving we need to understand what an ‘efficient basic movement pattern’ is.

When climbing outside, especially on the easier routes, an almost limitless number of foot placements options are available. Indoors however, in order to make routes harder, the holds will become fewer, smaller and placed further apart. Once a climber progresses through the grades they are often left with little option but to be climbing out of position (i.e. off balance) – with their feet much wider than the body’s centre of gravity and too high to be able to shift the hips sideways over the high foot in order to be balanced over the foot prior to the body moving upward. If this sideways movement does not happen it causes an over reliance on the upper body. When making the transition to the outdoors climbers are unnecessarily repeating these moves. They move in a way that their body has become accustomed to; high-step, pull with arms, rock over. The feet are moving past perfectly good foot holds to recreate a body position that feels ‘natural’. In reality it’s a bit more complicated than this but this is essentially how almost everybody is moving on the first day of a coaching course.


What might constitute a non-technical efficient climbing pattern?

Place your foot on to a hold. Then transfer the body weight onto the foot by moving the hips over the foot. It is possible to do this without the body moving up. In fact, if the body moves down as it moves sideways the arms can usually straighten. When fully balanced over the high foot, bend the knee of the opposite leg and use the hip joint to raise the leg and foot until it reaches the next foothold. All of this can be done without the hips moving in an upward direction. Now the body can be pushed up by straightening both legs; generating the upward momentum from the legs rather than pulling on the arms.


Climbing a ladder

I find the ladder analogy a good place to start when coaching outdoors. If the aim is to use the legs as much as possible protecting our weaker upper body then it might be useful to think about common terms we use to describe easy climbing such as: easy as climbing a ladder. What makes a ladder easy to climb? How would you design a ladder if you were going to make one?

The rungs would be close together below knee height and the width no wider than the hips. This way the feet are always directly underneath the body and never outside the width of our body. Making moves where our high foot is relatively low are easy to execute with minimal upper body strength. However as soon as we take our foot above the opposite knee pressing up from one leg starts to get hard so we tend to pull with the arms. The same is true when the foot is beyond the width of our body. If we don’t move our hips sideways over the high foot before lifting our back foot then our arms are holding a good percentage of our weight and we are therefore out of balance. Of course it is not always possible even when climbing on rock to keep your feet within the confines of a ladder but the more confident and skilful the climber is in their footwork, the more able they are to avoid being drawn out of position by bigger footholds that might not be best placed for transferring weight onto.

Having a non-technical movement programme allows us to focus on maintaining our form, and to easily recognise when we are choosing to go out of position and are no longer able to move our hips over the lead  foot. If we can recognise this we can more easily select the correct body position in order to execute the next move efficiently.


Analysing Movement Patterns

In the following sections I will be looking at how to analyse climbing movement and how to use the climbing gym effectively to develop efficient movement.

The motivation for writing these articles came about from coaching hundreds of clients who mainly climb or at least learnt to climb indoors. I was struck by how few of them understood any of the differences and how even those that had been coached assumed that what they had learnt indoors would help them climb on real rock.

Analysing a climbers movement pattern on an artificial wall can be difficult unless the climber is on a section of wall with an abundance of hand- and footholds (enough holds and easy enough grade that they are able to choose where they would like to place their hands and feet). The climber ultimately needs to be able to move freely and not be dictated to by spaced holds.

Filming climbers on easy routes, slabby or no more than vertical grade 3 to 5 even if they normally climb upwards of 7b, allows you to see how they naturally move when given a choice. If training mostly indoors and climbing the routes or problems as they are set, there is a risk of training our bodies to seek out the hard moves and overlook the easy ones. If we accept that climbing efficiently is important as a climber then we need to naturally seek out the easiest option. Of course, being able to execute hard moves is important but if our body naturally falls into familiar but unnecessary positions when on easy ground then we are wasting valuable energy. Climbing is a technical, balance based activity and executing moves when out of balance using the arms instead of the legs should be a last resort not the norm. I’ve coached many climbers in recent years who almost only do difficult moves, not seeing or considering an easier option as this would feel unfamiliar to them.

Once we understand what efficient movement is, we can choose to do a much greater percentage of climbing where we are not being dictated by the configuration of the holds. For example, if 80% of our climbing allowed us to move in a way of our choosing and we saw this as practice, we would have some quality control over how we move. If mostly practicing indoors this might involve climbing on sections of wall with many holds and using any colour for feet.


Based on efficient movement, what are we trying to observe?

I find it useful to start with transference of weight.

Is the climber fully moving the hips/centre of gravity over the leading foot? If not, why not?

Is the climber trailing the back foot as they move upward (climbers often arrive with a hole or wear mark on top of their shoes, this can be a giveaway), pushing from one leg rather than two?

Are they pulling on their arms or pushing from their legs?

  • Bent or straight arms?
  • Climbing dynamically or statically?
  • Making more hand movements/changes to foot changes?

There are many things that we can choose to look at when assessing how efficiently someone may be climbing. It’s best to keep it simple. It’s important to have the basics wired before moving on to anything more complicated.

Most if not all inefficient movement will be due to poor choice of foot- and hand holds. As good footwork is harder to develop it makes sense to concentrate more attention here.

The higher and or wider the leading foot is in relation to the back foot the harder it becomes to transfer weight onto it. Once the foot is above the opposite knee the leg is not strong enough to push the body up alone, so the arms need to help by pulling or pushing. For this reason, I begin with foot choices. If they are high, wide or both, I try to identify what techniques (if any) are being used to make upward movement as efficient as possible.

People are often surprised when they look nothing like they imagined on the screen. For most people it will be the first time they see themselves climbing. The fact that they are not flowing up the route with the grace of one of climbing’s greats can come as a bit of a shock!

It’s useful to have some positives to throw in with the analysis which if we are not careful can feel like a negative process (looking for things that the climber might be doing incorrectly or inefficiently). I must admit I’m pretty rubbish at this bit! I’ve learned that referring to how I know I used to climb before I took more of an interest in movement can help. But also looking at techniques the climber is using to compensate for being out of balance can help, as they are useful skills to have when climbing harder routes or features that require certain techniques. Watching how most climbers around them at the wall or crag will be moving with the same pattern is also useful.

From watching the video, it should be clear that if it is possible to take small steps, keep our feet close together then the climbing is naturally easier. Once the feet are outside the width of the body, sideways movement is necessary to move efficiently. The link below shows two climbers on the same route. The second climber is making good choices with the feet and displaying excellent technique.


How to make high or wide steps efficient

It is important to consider if poor footwork is the cause of us making poor choices with our feet in the first place. Often the inability to smear or stand on small edges is at play. When we must take our feet out of position, there are surprisingly few techniques that we might choose from:

  • Bringing our feet closer by stepping down with the high foot, bringing the back foot up a little before going back to the same highest foothold. Not really a technique; more away of avoiding the high step and remembering that this option often gets overlooked.
  • Cross over or through with the foot when going sideways.
  • Palming off or pushing down with the same hand as the foot we are going to move.
  • Dynamic rock over by bouncing off the back foot, generating movement from the legs to limit pulling on the arms.
  • Bringing the back foot up incrementally rather than in one big movement.

These options (apart from the dynamic rock over) should be made without upward movement of the body / hips.


Climbing is a discipline

Climbing is a discipline and like any discipline practice is necessary. Most climbers are self-taught and judge their expertise by the grade they climb, not necessarily by the quality of their movement. Most climbers just climb hoping or assuming they will get better. However, once we understand what efficient movement is, it becomes possible to self-coach. If we are present in the moment with each move we make and are prepared to fail seeking out the technical solution, rather than just pulling even if we know that we could, then we are practicing, and will make progress. Practice can only be done on routes easy enough to have both mental and physical space to consider each move.

By Trevor Massiah
This article was published in two parts in Professional Mountaineer Spring and Summer 2018

Interested in a Performance Coaching Course?
For more information and available dates, https://rockandsun.com/rock-climbing-courses/climbing-coaching/


[soliloquy slug=”costa-blanca-climbing”]
Placing Titanium Bolts

In the previous issue I looked at the lessons learned over the years from bolt placements and the advantages of titanium bolts over stainless steel glue-in bolts. Glue-in anchors that flex or deform can crack the resin, thus creating a crevice. Corrosion loves a crevice and this is therefore likely to shorten the working life of a plated steel or stainless steel anchor.

Here is some guidance for placing titanium bolts, gained from placing thousands over the years. At the time of writing the certified 8mm Eterna bolt (from Titan Climbing) appears to me to provide the best and most permanent solution, but the same placement principles apply to other ring bolts.


How to place titanium bolts – step 1

Before drilling, check that the intended bolt position is in good rock by listening for a solid ringing sound when it’s hit with a hammer. Choose a position that is a good distance away from cracks and edges. It is also worth considering how the gate on the bottom and top of the quick draw will sit against the rock.


How to place titanium bolts – step 2

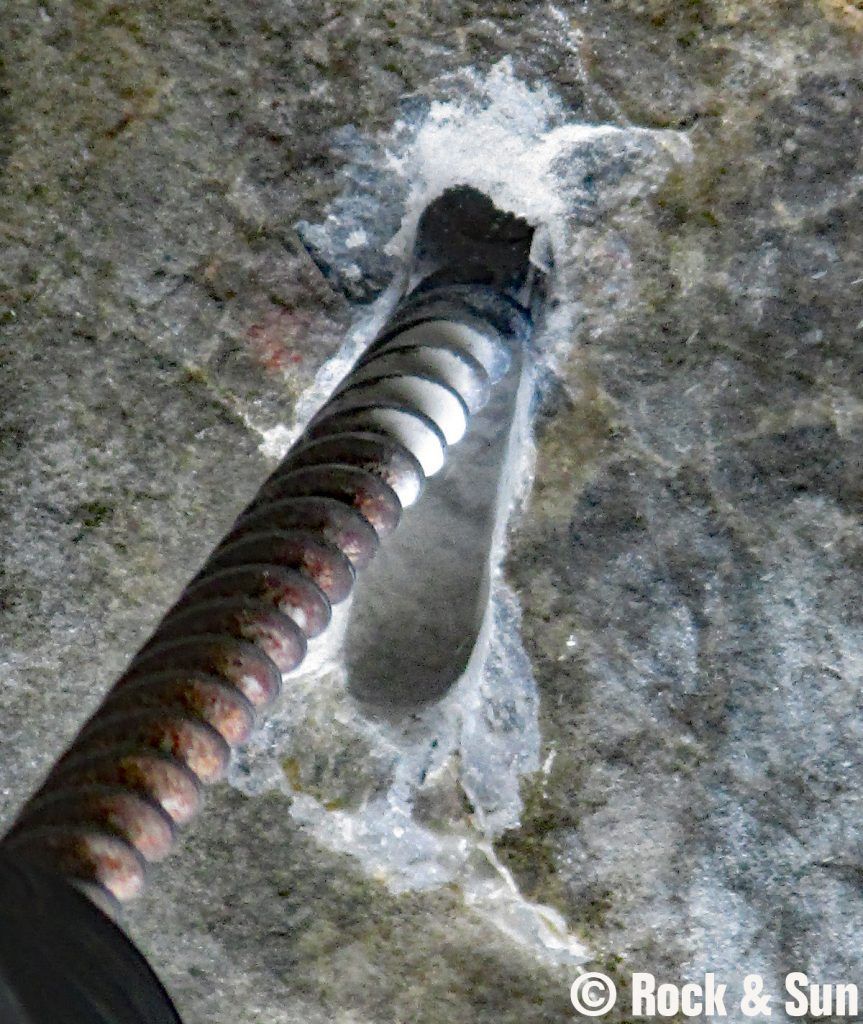
To place the Eterna bolt, use a 14mm drill bit to drill a 10mm deep hole where you want the top shaft of the bolt to be. Then drill a series of holes as close as possible to each other, directly below. Each hole should be drilled a few mm less deep than the previous hole. A total of three pilot holes should be sufficient with a 14mm bit to spread along a 45mm line. Return to the original pilot hole and angle the drill bit onto the bottom lip of the hole then drill down at an angle, drilling out the gap between each hole until you are left with one vertical trench. The angle of the trench should suit the curve on the eye of the bolt.
Trenching/recessing the vertical back bar of the eye of the bolt can greatly increase both strength and performance. Martin Roberts of Titan carried out tests on trenched and non-trenched bolts. The results showed that the yield strength (load at which the bolt permanently deforms) increased by around 50% for bolts that were trenched i.e. from around 10~11kN to 15~16kN. The bolts deformed elastically (flexed under load and sprung back to their original shape when the load was relieved) at a low load around 4kN when not recessed but when recessed this load increased greatly to around 12~13kN. The typical service load is below those figures, so this greatly reduces the potential problem of fatigue.


How to place titanium bolts – step 3

Once the trench is finished, drill your hole for the shaft of the bolt at the top (where your original pilot hole was). The hole should be drilled at a 90 degree angle to the rock face. In normal circumstances this hole can be over-drilled by about 5 to 10mm.

On steep rock, over drilling can be problematic as the bolt can slide out of the hole. The Eterna bolt has a special design feature that allows for easier installation on steep rock:
Tape the drill bit at 9.5cm and stop drilling when the tape is flush with the edge of the trench, flush with the rock. When placing the bolt gently tap it with a suitable hammer for the last 15mm for a tight interference fit. The last 15mm of the bolt is slightly over 15mm in diameter but will squeeze down then try to spring back once tapped into the 14mm hole, improving the grip.
Do not use a normal steel hammer as it will leave iron deposits on the titanium bolt and the iron will rust, which may cause corrosion issues with the titanium anchor itself. Either use a proper stainless steel climbing hammer, or a rubber or wooden mallet.


How to place titanium bolts – step 4

Check that the bolt fits easily into the hole: the vertical shoulder of the bolt should fit neatly into the trench. If any extra length is necessary, this can be achieved by drilling down on the bottom lip of the trench. The reason for the slot is to semi-recess the eye of the bolt to help ensure the strongest possible bolt installation for the given position. It also greatly reduces the effects of fatigue during normal use due to the increased stiffness. I always carry three bolts with me and check each one to allow for any slight variation in size.


How to place titanium bolts – step 5

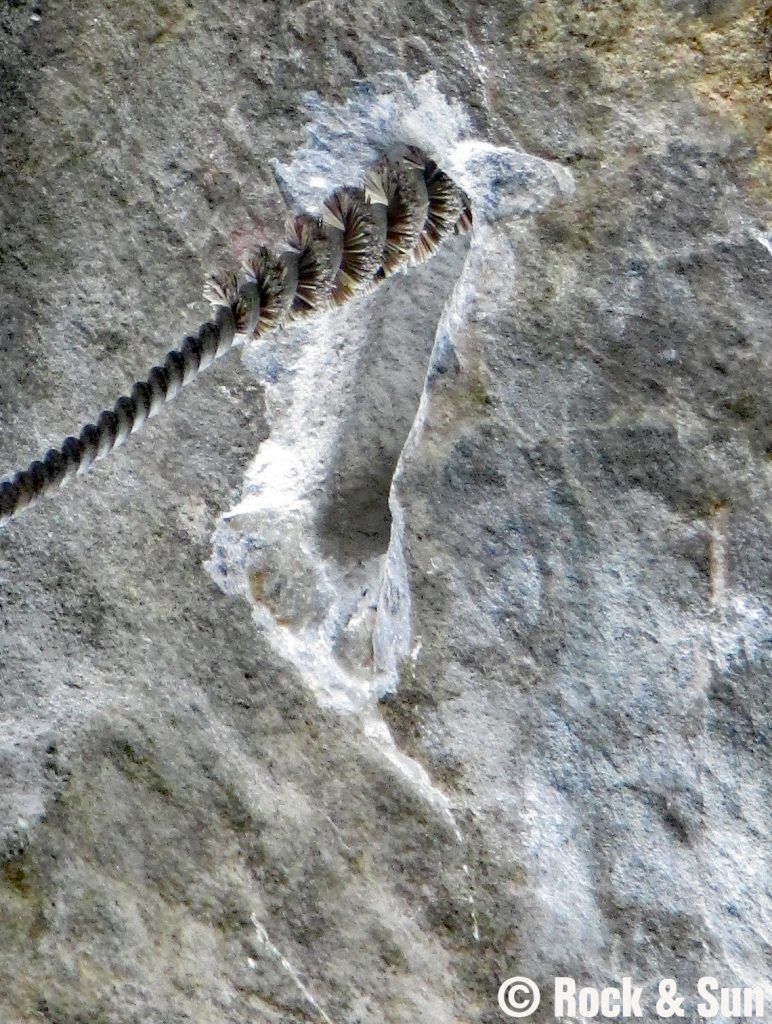
It is vitally important that the hole and trench are clean, and free of any rock dust before proceeding any further. I use a Hilti wire hole brush (a Metolius brush or a shaved down hard tooth brush with the bristles cut short can also work well) and a manual Hilti blow pump for alternate brushing and blowing. Alternate between brushing and blowing until dust is no longer visible.


How to place titanium bolts – step 6

Use the epoxy resin as per the manufacturer’s instructions. I recommend the tried and tested Hilti HIT RE-500. Pure epoxy resin is often as hard if not harder than the rock it is being placed in, so the more glue you use the better. It will also provide a greater chance of a good seal from the rock and increased adhesion to the bolt.

It is important to express and discard three full trigger pumps as a precaution before gluing your first bolt. I usually express the three full-trigger pulls into a plastic bag on the ground and then make three test beads somewhere on the ground or on the rock. This allows you to check how the glue has cured when you return the next day. If the beads are soft there was a problem with the mix. (If starting a new tube high up, one pull of the trigger for each bead.) The guns have an automated puncture system and one of the tubes is usually punctured slightly before the other leading to an uneven mix at the start.
There is a balance between speed of curing vs. “going-off” within the nozzle, and times vary depending on temperature. In hot climates, you should have a good 20mins prior to the resin going off in the nozzle.


How to place titanium bolts – step 7

Insert the nozzle fully into the hole. Almost fill the hole with resin by pulling on the trigger gently while slowly withdrawing. Try to avoid creating any air pockets by only withdrawing the nozzle while resin is being expressed. Insert the bolt, slowly rotating it as you do so. If you feel any resistance it will be an air pocket, this is best solved by withdrawing the bolt 1-2cm and inserting again, you may hear a small popping sound when the airlock is broken.


How to place titanium bolts – step 8

Continue inserting the bolt until it sits neatly in the trench. Having an ice-lolly-type stick is useful for dealing with any glue that oozes from the hole (a good excuse for a Magnum!). This can be used to backfill the trench and tidy up at the end. You can also use them to scrape excess glue from the nozzle.


How to place titanium bolts – step 9

It is important that the bolt is not recessed so far that larger snapgates do not fit. I test this while drilling with a solid gate on the bolt before gluing. The inside of the bolt eye should be flush with the rock surface.


How to place titanium bolts – step 10

You should leave at least 24 hours before loading even in a hot climate, although the glue should be cured within 12hrs, this is also where the test beads you made before gluing are helpful. Hit them with a hammer; if they’re completely dry, hard and brittle, then the bolts will be good.


Trevor Massiah is a Mountaineering Instructor based in Spain and is the owner operator of Rock and Sun which runs climbing and bouldering courses and holidays in many parts of the world. He has been working in the outdoors for 33 years and has climbed extensively around the world. His favourite crags are Pembroke, Taipan wall and the Needles California. He has put up many routes – both trad and sport – in the UK, Thailand, Australia, China and India, and is currently involved in rebolting existing routes and developing new routes in Thailand and the Costa Blanca.


by Trevor Massiah

Published in Professional Mountaineer Summer 2017

The Case For Resin Bolts

This article will look at why the use of resin bolts and anchors might be the best choice for sport climbing. It will also look at what might be the best materials to use and hope to share greater understanding of how they work and the choices available. Much of this has been learned through trial and error in addition to extensive research.


What are the advantages of resin anchors over expansion bolts?
  • No Spinning hangers.
  • No stress on rock due to expansion.
  • Better performance in softer rock types.
  • Less stress on bolt during installation. This reduces risk of stress corrosion cracking (SCC).
  • Expansion bolts are easy to over torque, which can result in premature failure. This can happen during installation or when a well-meaning climber attempts to tighten a loose or spinning hanger without a torque wrench.
  • Single component: this greatly reduces the risk of crevice and galvanic corrosion.
  • Reduces risk of hanger theft.
  • In the building industry, expansion bolt anchors are regarded as temporary fixings, with resin anchor bolts being used where a permanent fixing is required.


Having been involved in new routeing in Thailand since 1993 I’ve seen it go through some major changes, from rapid development into one of the world’s most popular sport climbing destinations in the early 90’s, to a dramatic slowdown as bolts started failing catastrophically. What were thought to be the best marine grade stainless steel expansion bolts would sometimes break under body weight less than a year after being placed!

A great deal has been written already about the tropical or marine environment and bolt corrosion. I do not intend to go into this in any great detail here but have included some links for those that are interested in gaining a better understanding of why and how certain rock types and environments can have a more aggressive corrosive effect on stainless steel, alloys and other metals than others than would be considered normal.

The tropical paradise of Thailand can be seen as a testing ground for climbing anchors. There does not seem to be a harsher environment for bolts than this one: if bolts can last in Thailand then they’ll work pretty much anywhere!

Once it had become apparent that even marine grade stainless steel expansion bolts would not work in Thailand, new route developers turned to glue-in bolts hoping that isolating the bolt from the rock and the greater surface area of the bolts versus that of a hanger would solve the problem. The results were mixed. A large variety of stainless steel glue-in bolts were used to rebolt existing routes and create new ones. It would take much longer for them to show signs of corrosion but in time even the best quality stainless glue-in bolts started to show worrying signs of corrosion and then failures started to occur. Unfortunately, the first round of rebolting was carried out with Hilti’s recommended RE-100 glue epoxy, but unbeknown to Hilti the cliffs in most Tropical locations suffer from a great deal of seepage during the monsoon season. RE-100epoxy is porous and not flexible enough. The ensuing cracking and shrinkage allowed water seeping through the rock to come into contact with the bolt. By the time we realised that the glue was a problematic weak link, hundreds of bolts had already been placed. When made aware of the problem, Hilti suggested using the RE-500. It is waterproof, can be used under water so also in wet conditions with minimal shrinkage, it is incredibly strong and should be good for 50 years or more. It is by far the best resin I’ve ever used.

At about the same time, an affordable source for titanium bolts had been discovered. Now there is much debate about other metals being as suitable for tropical or marine environments and it is not for me to suggest that anything other than titanium would be irresponsible but titanium bolts have been used in the Grand Cayman for more than 16 years and Thailand for a little over 13 years and are showing no signs of corrosion. The UIAA recently carried out some extensive research that led to the UIAA Safety commission recommending only the use of Titanium and high end ‘HRC’ alloys (6% Molybdenum stainless steel such as 1.4529, 254SMO) in these environments. They have also suggested that the expected life time of fixed protection in any environment should be a minimum of 50 years. It seems that the titanium bolts in combination with the RE-500 have the best chance of lasting a lifetime.

So where does this information leave us?

We have whole crags in places like Kalymnos being rebolted with stainless steel glue-in bolts less than 10 years after being developed. There is a reasonable chance that these routes will need rebolting again in 10 or 15 years. We have seen recent stainless steel glue-in bolt failures in Sardinia, multiple bodyweight failures in Taiwan of Petzl Collinox glued using RE-500 after less than 10 years, and Fixe anchor chain failures in the Costa Blanca. Some anchor failures and weld cracking have occurred at indoor and outdoor walls in both Germany and the UK. Perhaps we should take a longer term approach to equipping sport routes?

Maybe the pace of new route development will be slower due to increased cost, but the savings in rebolting could be enormous. Certified titanium bolts are now available from around £6.50 to £9 from Titan climbing, a Sheffield based company. This is not cheap when compared to expansion bolts, but they will probably last a lifetime if placed properly and with the correct glue. Pure epoxy resin can be purchased direct from Hilti or Titan climbing at a cost of around £16 per tube, which is enough to place about 25 bolts. A single pitch would cost approximately £75-£100 – even ignoring the safety advantages, surely at £2/year for a route anything else is a false economy?

In the next installment, I will share some of the lessons we have learned from placing thousands of bolts.

Trevor Massiah is a Mountaineering Instructor based in Spain and is the owner operator of Rock and Sun which runs climbing and bouldering courses and holidays in many parts of the world. He has been working in the outdoors for 33 years and has climbed extensively around the world. His favourite crags are Pembroke, Taipan wall and the Needles California. He has put up many routes – both trad and sport – in the UK, Thailand, Australia, China and India, and is currently involved in rebolting existing routes and developing new routes in Thailand and the Costa Blanca.

Further information


by Trevor Massiah

Published in The Professional Mountaineer – Spring 2017