The development of new routes in the Costa Blanca continues. Rock & Sun’s directors as well as main climbing instructors, Trevor and Desiree, share a passion for route development, so when they have a few days off, it is likely that they will be putting new routes up somewhere in the Jalon valley. They both love the creative process of spotting a new line of unclimbed rock. Often hidden behind trees and bushes – which Desiree takes care of. Then Trevor will set up a trad anchor from which they will toprope the newly exposed rock to see if there are any worthwhile climbs to be put up. If there are, then we have several trial runs on where best to place the bolts, after which Trevor gets the drill out to bolt the route. For more info on this process, read our earlier blog.
So far in 2023 this has led to 6 more sport climbing routes. So there are more and more climbs for you to have a go at, and there is something new every time you come back to the Costa Blanca for another climbing holiday.
We have kept the new route development quiet for a while, allowing us the time to climb these new lines with our clients, to get a better idea of the grades. But now we are ready to share with you the list of new climbs at Pena Roja in LLiber:
Route 1. and 2. are at the furthest left side of the ‘old side’ of the crag, in the guidebook called Lliber, Pena Roja ‘Antiguo’. The routes are immediately left of the existing route ‘Problema Izquierda’. Shade from 15.30pm onwards. They each have their own anchor. From left to right:
1. The Demands of Thor, F4, donated and named by Hannah and Ben Morgan-Gray
2. El Regalo, F4+, donated and named by Marta Kodin
The other 4 new routes are in ‘the tree sector’ at Pena Roja, in the guidebook called Alejandria-Izquierda. All 4 routes are left of Barney Rubble F6C. These climbs are in the shade until 12, and again after 16pm. From left to right:
3. La Jirafa, F4. Named by Rock & Sun (look around to see why we named it as such).
4. Rebecca, F5+, donated and named by Stuart Jamieson
5. Roger, F6A, donated and named by Daniel Graham
6. Bogota 2600, F6B+, donated and named by Mark Weenink
(all bolted by Rock & Sun: Trevor Massiah and Desiree Verbeek-Massiah)
Bogota 2600, 6B+
We have our eyes on a few other lines in the Jalon Valley and nearer the coast. So when we have another gap in our calendar, we will get started on those. Keep an eye out for more news. And get in touch if you would like to donate into the Rock & Sun bolt fund. If you donate £75 or more, you can name the route!
Strategy and a little bit of discipline are key ingredients to a successful day of climbing.
Far too often we see climbers arrive at the crag, full of enthusiasm and energy, with their goal for the day in mind. So keen to climb hard that day, that they don’t bother warming up. You can see them thinking (or sometimes we are lucky enough to overhear them say): “I think I can warm up on the route I finished on yesterday”, or “I don’t want to waste energy warming up and then be too tired to get the red point of my project”. So they start on something that is too hard for them to warm up on, which may lead to getting pumped, frustrated, or both.
Over the years we have realised that most climbers don’t think much about how to structure their climbing day. Some don’t realise how important warming up is. Some don’t know how to plan the day in such a way that they climb to the best of their ability by the end of it. And how are they supposed to know if nobody has given them advice on this?
This blog is all about how to structure your climbing day to get the best out of your body and mind.
Warm up.
Get your body and mind ready for the climbing day ahead. Climb a route that is very easy for you. A route that is well within your grade and don’t expect to fall off of or even get pumped. So you can just let the body move, not getting physically or mentally stressed. Climb it in your comfort zone the whole way up. Should things for some reason not feel easy for you during your first route: let go and sit on the rope.
Ego.
Our ego can get in the way of ourselves at this point. You don’t want to let go. You don’t want to ‘lose face’. You may even let the other climbers know “I climbed this without problems last time I did it”. You hold on and struggle on, your arms getting more and more pumped. You could of course have misread the guidebook and be on something harder than you intended.
Avoid Flash-Pump.
It’s called a flash-pump and it is very difficult to recover from. It may well stay with you all day. A warm up is what it is, a warm up. Get the blood pumping around your body with gentle movement like jogging or jumping. Lubricate the joints, activate the muscles. Don’t let your performance on the first or second climb affect your confidence. Don’t come to any conclusions about how you are going to climb that day based on how you climb the first few routes. If you felt clumsy, unfocused, tired, distracted or any other negative sensation, that is normal: you’re warming/waking yourself up. This is exactly why we warm up. To get that out of the way.
Fall.
We recommend to include some deliberate falls in your warm up routine. Letting go and practicing getting the landing right, releases the tension in the body and mind. Once we have experienced the apprehension before letting go and then the sensation of falling, we have reminded ourselves that we know how to fall and how to land. It relaxes you into the climbing. It stops you from over-gripping the handholds. It slows down your breathing. All of which help to increase the enjoyment (and performance) of your climbing. When doing fall practice on a regular basis, it has proven to be sufficient to do 2 or 3 Clip-and-Let-Go falls every time you go climbing. That hardly takes any time, and is extremely beneficial. Please read our blog “A fresh look at Fall Practice”.
Mileage.
Now we are ready for the main part of our climbing day.
As a rule of thumb, we aim to climb 6 routes in a day: 2 easy, 3 mid, 1 hard. And we rest at least 10 minutes in between every climb. This is increased to a 20 to 30 minute rest when we climbed to our max.
This rule of thumb can vary based on the aim for the day. If it is a day to do some climbing drills to improve your movement, then you would increase the volume. You would climb 10 routes, 8 of which easy where you can apply the drills, 1 mid where you incorporate the drills in the way you climb the route, and then 1 hard route where you can let the drills go out of the window and just try to climb the route as best you can but not worrying too much if you can’t hold your form.
If it’s a day of redpointing your project, then you may do 1 easy warm up route, 1 mid warm up route which includes some fall practice, and then move on to your chosen project. You could continue your warm up by bolt-to-bolting that route, or by stick-clipping your way up. Otherwise do something close to the grade of your project and if possible a similar style of climbing. Depending on how close you are to sending the route, the angle of the rock and how easy it is to bolt-to-bolt the route without falling into space and struggling to get back on: once you’ve reached the top, you could choose to toprope the route. And ego comes into play here again. Do no try to climb your project clean on toprope so you can say you’ve done it, or so you build confidence in your abilty to do it. It is smarter to hang or fall and repeat certain sections. Figure out the best sequences. Memorise the crux(es) of the route. And then your body is properly warmed up and you have all the knowledge in your head so you would then have a lead attempt.
Golden Standard.
Whether you are planning a day of ‘just going climbing’, onsighting, doing drills, or redpointing, we recommend that your climbing day meets the Golden Standard of 80:20. Where 80% of the session is practice and 20% is performance.
We wish you good luck in staying patient and in choosing discipline over ego, and hope you’ll experience the benefits of adding some structure to your climbing days. And don’t forget to have fun even when you fail.
Climbing grades are source of much debate. Who decides what the grade of a route is? What makes a route a certain grade? In this blog we will answer the frequently asked questions about sport climbing grades.
When climbers come down off a route, very often the first thing they say is something about the grade. “It is definitely not a 5+, at least a 6A”. Which happens a lot in the Costa Blanca. Or “I would love to ‘take the grade’ but that clearly it is not a 7A, more like an easy 6C, maybe even 6B+”, which is more common on Kalymnos.
In an attempt to not get sucked into a discussion on numbers and talk about the route itself, we ask the climber: Ok, but did you enjoy it? Was it a nice route? Did you climb it well? Were there some good moves on it? Because what’s in a grade? Are you climbing to ‘achieve’ or ‘chase’ a number? Or are you climbing because you enjoy climbing, want to solve the puzzle the rock presents to you, and climb a route in a way that feels right or nice to you?
Who decides what the grade is?
The grade is given to a route by the person who climbs the route first, its first ascensionist. In most but not all cases, this is the person (or: are the people) who bolted the route.
Routesetters with a larger frame of reference are more likely going to be ‘correct’ with their grading. How many years have they been climbing outdoors themselves? How many routes have they bolted before? Do they set the grade after their own ascent, or do they wait giving it a grade until they have seen other people climb it? Not all route setters have this opportunity but for us that is an important element of grading. We often get asked (or overhear other climbers having conversations about lower graded routes) “how can they tell the difference between a 5, 5+ and 6A, when they climb 7s all the time”? Well, because of years of climbing experience, and years of working with clients climbing those grades.
A team of climbers from the indoor climbing gym in Switzerland, called Griffig, have recently developed a new crag on Kalymnos, equally named Griffig. Everyone we spoke with who climbed at this crag says that the routes there are overgraded by at least 1, sometimes even 2 or 3 grades. This may be in line with what we have noticed on other occasions, when outdoor routes are set and graded by people who mainly climb indoors, it feels harder to them and as a result the routes are likely to be overgraded. Climbing rock not being their main surface to climb on, their footwork and routefinding skills may therefore not be as developed as amongst people who climb outdoors a lot. The ‘outdoor climber’ may find an easier way, resulting in the downgrading of the route. The overgrading of Griffig may also be explained by possibly them being in a rush to finish this crag before the masses of climbers would turn up leading them to give estimated grades on some of the routes. Or, another explanation could be – and this is something we were informed of recently by people who have been on a ‘Route Development Course’ – they are advised to inflate the grade so the route becomes popular. Well, that definitely did the trick for Griffig!
That brings us to the second part of the answer to “who decides what the grade is?”. After the routesetters or first ascensionists have graded a route, the vote goes to the outdoor climbing community. On websites such as UKClimbing climbers log the routes they have climbed, and leave their feedback on the grade they think it is. For a route graded 7B+ in the guidebook, you would get for instance 5 votes for “mid 7B+”, 11 votes “low 7B+”, 20 votes “high 7B”, 32 votes “mid 7B”, and 18 votes “low 7B”, then there would be a reasonable amount of doubt cast on the original grade and a route may get downgraded to 7B.
You can assume that for established routes that have been developed a few years ago and climbed by many people since that the grade is settled.
Which factors influence the grade?
The grade of a route serves as an indication of what difficulty to expect. It is not an exact science with a formula that can be applied to any route, in which case everyone applying that formula would get to the same grade as a result. However, there are of course objective things that route developers and climbers take into account when grading a route (not necessarily in order of importance):
1. The hardest move on the route. If you have a 32m route that is 5 all the way except for one 6B move, then it has to be graded 6B, otherwise a ‘5-climber’ would be deceived into thinking they would be able to climb the route. So a route has to be graded for its hardest move.
2. How many hard moves. The next thing to take into account is how many hard moves there are, more specifically, how many hard moves in a row. A route can be a ‘one move’ crux, or it can be very sustained, with many moves of a certain difficulty in a row, or it could have several cruxes instead of one, but with good rests in between. If a route has a one 6B move crux, it would be a 6B. Does it have a longer sequence of multiple 6B moves in a row, then the overall grade is likely going to be 6B+. Does a route have multiple 6B cruxes but for instance the angle of rock allows the climber to have good rests in between, then 6B remains the fair grade.
3. Length of the route. Similar but slightly different, is the length of the route. Is stamina needed for a 40m pitch or is it all over in 12m? A 12m 6B most likely has a harder technical crux than a 40m 6B of which the hardest move may be 6A+ but the extra grade is given to reflect that one has to be focused and on one’s feet for much longer.
4. The equation of the size of the holds, the spacing of the holds, the angle of the rock, and the friction of the rock. (read more below – Anecdote: size of holds)
5. The area where the route is. Every climbing area has its own history. Routes are graded in relation to existing routes. This means that within a climbing area, the grade gives an indication of how hard a route is compared to its neighbour. But often it does not work to compare one-on-one for routes in different areas. Some areas even become less popular because grades there are hard, and people allow themselves to be disappointed that they are not able to climb the grade they would climb elsewhere, and have to drop down a grade or two in this area. Climbers do like the ego-boost of climbing in areas where the grades are ‘softer’.
Anecdote: Size of holds.“The footholds are too small to call this a 5”. One of our clients said exactly this about Awesome (Pena Roja, Lliber) and it opened an interesting discussion, leading to a better understanding of the debate around grades. If what the client said is true, then how small can footholds be to give a route a certain grade? If there is one section on the route where the footholds are 1cm2, does that make the route a 7A? Just because you aren’t usually ‘forced’ to use small footholds on a 5? And if we were to grade routes for the size of the footholds, would there be a standard like in clothing where different cm’s equal different sizes XS/S/M? For instance foothold size >5cm2 = F3, 4-5 cm2 = F4, 3-4cm2 = F5, 2-3cm2 = F6, 1-2cm2 = F7, etc? We don’t think a system like that would hold up, as the difficulty of the move is an equation of the size of the holds, the spacing of the holds, the angle of the rock (A small foothold on a slab can be a great foothold), and the friction of the rock. Think of a crux sequence of a route, with a certain set of holds and the distance these are from each other, but then tilt the angle of rock a little bit, or reduce the friction, and it’s easy to understand that size alone doesn’t matter. It really is the overall technical difficulty of a move. And to come back to the route this client commented on, many of our clients who can climb F5 but can’t climb F6A, are able to stand on these small footholds, on this angle of rock, with its friction and the availability of handholds, and complete the climb.
Anecdote: Guidebook. Sometimes a route description in the guidebook will say “…, harder for short people”. This makes us laugh. Are we moving to a situation where a route is 6C for the strong, 6B for those with good technique, 6C+ for short people? Where does it end? The grade should refer to the route, not to the skills or physical characteristics of those who climb it. Which moves us onto..
Make the route the grade
Route reading and route finding are crucial as the grade refers to the easiest way to climb this route. Some routes are harder to read than others. Did you not climb it the easiest way, then you may have turned a 6C into a 6C+ or 7A. That’s why climbers shouldn’t really say much about the grade of a route when they have climbed it once. They should say something like “the way I climbed it, it felt like a … to me”. That way the climber acknowledges that they may not have gone the exact easiest way, may not have found all the hand- and footholds, may not have climbed it with the most efficient hand- and feet sequences.
Anecdote: New Beta. While bolt-to-bolting La Bella 7B at our local crag (Pena Roja, Lliber), having failed to execute the several ways I had seen other climbers do the crux moves, I hung on the rope – again. I thought I was never going to be able to do it this way. I looked around to see where the rock from this to the next bolt is less steep for my feet and then I noticed a line of feet going out left. And there are some handholds out left as well. I reckoned: It is less steep, the fall is clean, and this crux sequence ends on the same hold as the more common crux sequences. But later, while I was sending the route going left at the crux instead of going over the bulge, the locals sitting at the bottom of the crag said – loud enough for me to hear – “she’s going off route, it’s not 7B that way”. I am fine with that. I am happy to have found a nice and easier way to climb this route and if ‘my way’ is 7A+ then that’s great.
We will soon publish an article about Routefinding on our website or in a climbing magazine.
Grade for the onsight or for the redpoint?
Although that seems a simple either-or question, in reality the answer lies somewhere in the middle. Is it a route where the routefinding is obvious, a route that is easy to read? It is likely that people will find the crux hand- and footholds? Then a route is not much harder to onsight than it is to redpoint. But is it a route with several sequences that are difficult to see or figure out while onsighting, then it seems fair to us to grade for how hard the route feels without previous knowledge. It is commonly accepted that a redpoint is easier than an onsight. We think it is fair to grade for the onsight for routes that are within climbers’ onsighting capabilities. Within the climbing community, many climbers can onsight up to about F8A/+. When you go beyond that, it makes sense to grade for the redpoint as there aren’t many climbers attempting to onsight those routes.
Anecdote: Grace. There’s a route called Grace (7A) at Chong Phli in Thailand. The local climbers for years have been saying that it is actually only a 6C+. But we agree with its original grade, having climbed the route with many of our clients and therefore having been able to use them as our frame of reference. Grace is a rather sustained route with multiple cruxes. If you don’t find the best holds, or don’t climb the best sequence in either of these sections, it certainly feels harder (less stable on the feet, more relying on the arms) than it does to the local climbers who spend no time looking for holds or working out sequences. Once a climber has bolt-to-bolted and redpointed Grace, and quite literally is able to climb it Grace-fully, it could feel like a 6C+. But to get to that stage, a lot of effort needs to be put in, which we would argue justifies it being graded 7A. Onsight Grace feels more like 7A+. As a redpoint it could be a 6C+.
Final remarks
A grade in a guidebook is quite literally a guidance. The purpose of grading routes is to give the climber an idea of what is available to them from one crag to the next, and to choose the climbing experience they would like to have. Climbers roughly know their warm up grade, their onsight grade, and their redpoint grade. When going to a new area, jump on a couple of easy route first to see how the grading fits with other climbing areas you have been to, so you can pick the right challenge for yourself on that given climbing day.
Of course, talk about and discuss grades as much you like but our advice is: do not let it become your main focus point or main aim. Don’t allow yourself to be disappointed by a grade or it being the only thing you have to say about a climb. Don’t reduce a climb to its number. Enjoy the route. Enjoy solving the puzzle it presents you. Enjoy the moves. Enjoy your climbing.
*For reference to those who climb in areas that don’t use the French grading of sport routes, please see below the Climbing Grade Conversion Table made by Rockfax*
If you follow Rock & Sun on Facebook, Instagram or via our Newsletter, you would have seen a few posts this year about the new routes we developed in the Costa Blanca during the Corona pandemic. Here we will describe what it entails to make them, what we love about new-routing, plus we’ll give the overview of all the new routes as most of them were developed just after the new Costa Blanca guidebook by Roberto Lopez was published. We also aim to answer the questions you’ve been asking us about developing new routes. If you have more questions after reading this blog, please send us a message and we will add it to this blog.
New-routing during Covid-19
International borders being closed for tourists for most of the time between March 2020 and May 2021 meant that we had a lot of time on our hands in the last year or so. Once the initial and very strict lockdown in Spain ended and we were slowly gaining more freedom again, we at first felt it could be considered too ‘frivolent’ to start climbing for fun again. But we considered going to the crag to create new climbs a justified reason to go to the crag. The first routes we started to work on were the 4 routes ‘in the trees’ in sector Alejandria of Pena Roja (see the full overview of new routes at the bottom of this blog). Trev had his eye on this sector mainly because of the easy angled rock and the fact that it is protected from the sun by the trees. If we could create some routes here, that would allow us to climb at Pena Roja all day; starting in Alejandria-riverbed in the morning, then move into the trees, and finish the day at the original wall of Pena Roja.
What is your motivation for developing routes?
A question we get asked quite regularly, as most climbers ‘just’ climb and never put up a route in their whole life. Routesetters can be quite invisible, and unless you get to see someone developing a route, you may never really think about how and why those bolts got there.
There are several reasons why we like to get involved in bolting routes. One is because we are well aware of the fact that as Rock & Sun we use the Costa Blanca for our Sport Climbing Holidays and Performance Coaching Courses. We climb routes that have been equipped by others, we bring more climbers to this area. We therefore find it important to do something back. Not only by maintaining existing routes or sectors (we for instance replaced 10 anchors at Sierra de Toix Oeste with titanium glue in anchors), but also by creating more routes. This will give the locals something new to climb, and it will give climbers from other areas something to come back to the Costa Blanca for, and it means that on busy days at popular crags, people can spread over a greater number of routes without having to wait for one another.
Another important reason to develop new routes is so that when we are working with our groups, we can organise our climbing days in a different way and thereby offer our clients better climbing experiences. By for instance creating routes that are in the shade around midday, it means that when it’s hot we can climb in the shade all day, moving from one sector to the next, instead of having to go back to the villa for a two or three hour break before heading out to the crag again. And it also means our regular clients will have something new to try on their next trip. Finally, the routes we set tend to lend themselves really well for climbing coaching; they are good routes to practice route-finding and/or work on technical movement patterns.
The whole creative process from spotting to bolting new lines is our third motivation. We all have a different creative outlet; some of us sing, make music, love cooking, painting or making furniture. For us, it is new routing that ‘ticks us’. Trevor is naturally looking for new route potential at any crag we go to, even at any crag or piece of rock we drive past. He is always spotting natural lines or striking features that would be amazing to climb. Those of which that are on shady crags, with a potential grade range from 4s to 6s are the top of our list to have a closer look at and decide to start working on. What Desiree loves most about this creative process, are first, the uniqueness of climbing an unclimbed piece of rock and the freedom to decide where it climbs best, and second, the removing of loose rock, vegetation and mud, behind which you often find beautiful handholds.
These cleaning activities naturally lead us to our final motivation of new-routing: it is a great way to get fit. After 2,5 months in total lockdown, having drunk and eaten more than we could burn off, we had some kilos to lose and muscles to regain. Hanging in the harness all day, jumarring up the fixed line, using a crow-bar to get body-size blocks of rock off, hammering other loose rock off, drilling and brushing provides a quite intense full-body workout.
The rock scars as well as rocks at base of the crag show the amount of rock we removed (sector Estado de Alarma, Cuarentena, Corona)
Do you need permission or a qualification to make new routes?
There is no qualification for route-setting. It is a skill that is often passed on from an experienced route-setter to an ‘assistant’ to learn all the ins and outs involved with doing a good job at it.
Whether permission is needed completely depends on where we want to develop new routes. If the land is privately owned then of course we’d need permission from the land owner. As it happens though, on more than once occasion it has been the other way around, and Trevor has been asked if he would please come to have a look at a limestone wall and develop routes there. These instances were in Thailand, where the owners see the potential of building bungalows and a restaurant to accommodate the climbers, once the routes have been developed. A win-win situation.
If the crag is on public land, we ask around among local climbers to see if permission would be needed from the forestry commission and/or from the municipality. For the past year we have wanted to start developing this untouched, north-facing crag, not far from where we live. We explored it on a few occasions and see great potential, but after talking to some local climbers we decided that now is not the right time to ask permission from the local government. So we will save that crag for another time in the future.
On existing crags, we use the following logic. If it is an established crag where there haven’t been new additions for a while, then we assume that the original route developers have finished the lines that they want to put up. And that they would not be against us developing more routes. Most local developers are, A: not interested in removing tons of loose rock or vegetation, and are B: not interested in bolting low 6s, 5s or 4s. Whereas those grades are of great interest to us. The routes at the Alejandria sector in the trees for example, from Estado de Alarma till Distanciamiento Social, took a lot of effort to get cleaned. We spent multiple days up there with a crowbar and lump hammer to make this area safe for climbing. And possibly more surprisingly, the sector at Alcalali from Artmosphere till The Baker was never developed before because the rock was invisible behind the trees and bushes that were growing on its ledges. Once we cut those down, a beautiful compact slab appeared with four striking lines. We opened this sector in November 2020, and with Alcalali being the perfect winter crag in the Costa Blanca, these routes were popular right from the start.
Finally, if the crag we have spotted a line on is still in development, which was the case for Murlali, we ask the people who are bolting there whether they are planning to bolt the line that we have seen. For “Cuando termine el cierre” we were given permission to go ahead and develop that route. The last thing you want of course when you are aiming to contribute to a climbing area is to upset the other developers and climbers in that area.
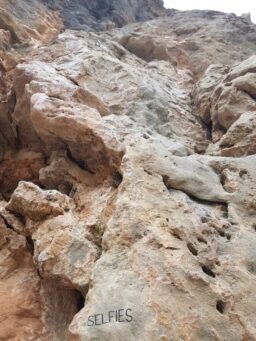
Selfies (5) was donated and named by Ross and Ness Self
How much does a route cost?
This depends on the materials used. Titanium bolts that need to be glued in with a special waterproof glue (Hilti RE500, see our blog on placing titanium bolts) are more expensive than 12mm expansion bolts, which are more expensive than 10mm expansion bolts. And expansion bolts come in different alloys that vary in cost and durability. It also depends on the length of the route, or more precisely, how many bolts are needed to protect the route. Besides the material going into the route itself, there are the associated costs of the tools and protective equipment: a cordless battery-powered hammer drill (we use the Hilti Te4-A22), drill bits, ropes, saws, brushes, etc.
We estimate that on average a route costs £75.
Is there a bolt fund? How can I contribute?
In the Costa Blanca there is no bolt fund. We feel it is our obligation to contribute to the maintenance and development of this area and have been investing in it using our own funds. We do of course welcome contributions and have set up a donation page in the Rock & Sun Shop. For a £75 donation you get to name the route. Climbers visiting us in the Costa Blanca can contribute by buying a Rock & Sun t-shirt or renting our climbing shoes, harnesses, or helmets; all this income goes towards route development and route maintenance in the Costa Blanca.
How many days does it take to make a route?
On average it takes 2 days to develop a route. This however completely depends on whether it is the first route on a sector and we need to get access to the top of the crag, or whether we are creating a new route next to an existing one, in which case we can simply traverse across from the existing anchor. Besides the ease or difficulty of getting access to the top, the time it takes to make a new line also depends on the amount of vegetation and loose rock that needs to be removed.
Trevor on the first ascent of Tiger Balm (6A+)
What is the process of making a new route?
First we need access to the top of the crag. Sometimes it is possible to walk to the top of crag and set up a temporary anchor there, using trees and or trad gear. When that is not possible and it is also not possible to traverse across from an existing anchor, then Trevor will trad climb up a route from the ground and make a trad anchor at the top. This anchor is not necessarily in the spot where the final anchor will be but can be used during the routesetting process. Once a line is fixed, we can haul the drill up and drill 12mm holes to place Petzl removable bolts and take out the trad gear.
Using the temporary anchor, we set up a toprope. Both of us climb the ‘line’ at least twice. Do we choose similar ways to climb this unclimbed piece of rock? Does it go where we thought it would when we were looking at it from the ground? Is it a worthwhile route that we can make safe and fun to climb?
Once agreed on where the route goes (more or less) we climb it again to mark where the bolts go. This is a very interactive process between climber and belayer, and a lot of thought goes into it. Ultimately we want the bolts to 1) be in solid rock, 2) protect the climbing, 3) be in comfortable clipping positions for short and tall people, 4) allow the rope to run more or less in a straight line. Other considerations are that the bolt should not interfere with hand-or footholds, that the quickdraw should be hanging ‘free’ in the bolt (not pressed against or over the rock below the bolt). We both climb it several times, marking, erasing and re-marking bolts until we are happy that the bolts are marked where we would like them to be.
Depending on the amount of vegetation and loose rock, the route is either being cleaned before marking the bolts – if there is a lot of cleaning to be done, or afterwards – if the cleaning is more or less ‘cosmetic’. Desiree usually does the cleaning jumarring up a fixed line, instead of a toprope, so we can both work at the same time. Trevor can for instance be on a fixed line next to it and drill the bolts on the next route.
Trevor sometimes starts with the first bolt from the ground, working his way up to the anchor. Other times he starts at the top and works his way down. Before drilling the hole, the quality of the rock is assessed once again with the hammer to make sure it is in good quality rock. It is not always possible to put the bolt exactly where you would like it to be.
Once the bolts have been placed, we do a final clean of the route: blow off the drill dust, brushing the holds. Sometimes we reinforce holds with glue, to make the route safer (we did this for Cuarentena and Corona), or to make sure that the crux hold won’t break off (we did this on Tiger Balm).
Then one of us gets the privilege of the official “first ascent”. Climbing the route on lead for the first time, helps us to get a better idea of what the grade might be.
Trevor on the first ascent of Golden Jugs (6A)
Final Words
The good thing the Pandemic has brought us, is time. It has been great to invest in the climbing in the Costa Blanca by developing new lines. We love the process from spotting a line on the rock, to cleaning the vegetation and loose rock, to deciding where the bolts should be, and having the first ascent.
That is when the next bit of the fun starts – introducing the route to other climbers and watching them climb it. Do they go ‘the right’ way? Do they more or less get the difficulty they were expecting based on the grade we gave it? And most of all, are they enjoying it?
As the Pandemic is nearing its end, and international travel being allowed again, we are very much looking forward to our clients returning and allowing them to have a variety of new climbing experiences.
Full Overview of routes bolted by Trevor and Desiree during the Covid-19 Pandemic[i]
Crag
Route Name
Grade
Donated and named by (if applicable)
Finished around
1
Alejandria (in the trees) – Pena Roja, LLiber
Barney Rubble
6c
Aug 2020
2
Yabba Dabba Doo !!!
6c
April 2021
3
The Flintstones
6c
Aug 2020
4
Estado de Alarma
6b
June 2020
5
Cuarentena
4-5+
June 2020
6
Corona
4+
June 2020
7
Distanciamiento Social
6a+
June 2020
8
Alejandria (riverbed) – Pena Roja, LLiber
Denise Denise
4
June 2020
9
Awesome
5+
June 2020
10
Rainbow Feet
6b+
Feb 2021
11
Golden Jugs
6a
Alan Britton
Feb 2021
12
Voltarol
6c
March 2021
13
Tiger Balm
6a+
Feb 2021
14
Selfies
5
Ross and Vanessa Self
Feb 2021
15
Take is not a safe word
6b+
Blanka Nori
March 2021
16
Alcalali
Epidemiology
5
Paul Cooke
Jan 2021
17
Viva Colombia
5+
Mark Weenink
Jan 2021
18
Artmosphere
6a+
Rianne Verbeek
Nov 2020
19
Rocky
6a
Steve Cox
Nov 2020
20
Gene
6b+
Nov 2020
21
The Baker
6a+
Nov 2020
22
Murlali
Ben & Jerry’s
6c
Mark Haworth
Feb 2021
23
Cuando Termine el Cierre
6c/+
Stewart Robertson
Feb 2021
[i] Multiple routes at the same crag are described from left to right when facing the crag
*Alcalali and Murlali are temporarily closed for climbing due to a discovery of ancient cave paintings. Once these have been analysed and protected by the researchers of Alicante University we expect these crags to be opened up to climbers again.*
Placing trad gear between bolts can be an effective solution when struggling to find easy well-bolted routes for clients. Low grade routes can often be the worst to fall on due to the easy angled nature of the rock, making it far less likely that falls will be clean. Let’s face it, how often do we struggle to find well-bolted easy warm up routes? Bolts on these routes are often placed where the climbing is a little more difficult and the possibility of falling possible. This can often lead to long gaps where the first ascensionist may find it hard to imagine anyone falling but the consequences may prove to be serious. This can result in intimidating or terrifying first leads for clients.
Firstly, let’s look another option available to us before we look at the advantages of placing trad gear.
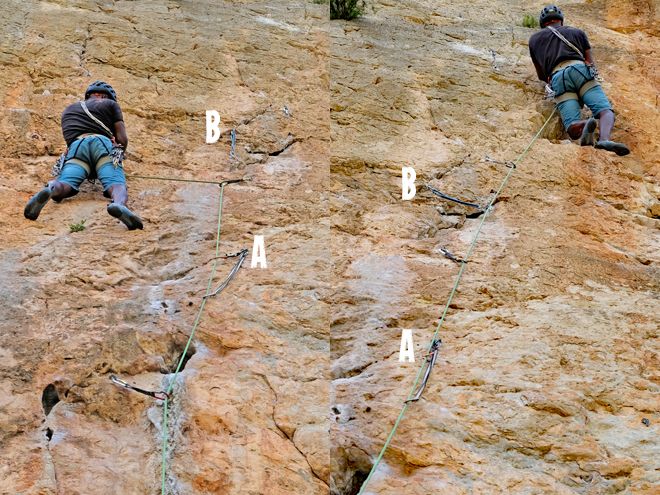
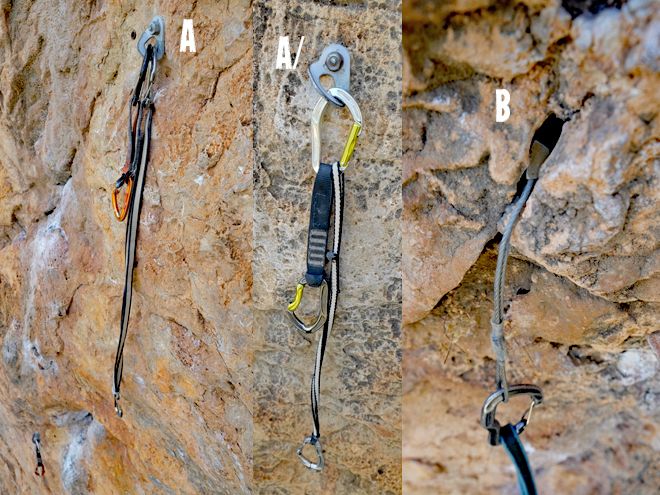
Using a sling or an alpine draw on the bolt can work well when the distance between bolts is not too long. This will bring the clipping position closer to the previous bolt (or ground) and is sometimes all that is necessary. When using this option, it is important to consider that we may have now created an unreasonable or unsafe gap to the next bolt. This can easily be solved by also clipping a standard length quickdraw onto the same bolt. This usually becomes essential when using a full-length sling to extend. Something that we need to be aware of though when using this method is that a high percentage of clients forget to clip the standard draw. This happens surprisingly frequently!
I’ve found that once people have clipped whatever is on the bolt, they tend to then focus on the next bolt. They will not necessarily pay attention to what else is on it when they get to within reach of the bolt itself. If working with a small group where it is possible to watch each climber closely enough to remind them as they pass the bolts, then this is fine – as long as they hear you and process your words. If working in larger groups where close supervision is not possible it can however present a real danger. For a number of reasons climbers may not be taking into account the distance between clips or be aware of the consequences of the fall (this can be even more problematic if any of these extended clips are out of view). When this occurs, we may have fixed one problem but created another.
It can be helpful to use a brightly coloured quickdraw that will stand out from the sling when you are using this method. A clear briefing on how to manage these clips is necessary but even then, the expectation should be that the distractions involved while climbing will cause a good percentage to forget. Therefore, I prefer to minimise the use of this technique if possible.
A, A/ Two ways of reducing distance between bolts. B Trad gear in between bolts
So, let’s look at the advantages of placing trad gear for your clients to clip:
Reduces the distance between clips: this can minimize the chances of sustaining injury when falling. It can also help make the experience of leading less stressful and more enjoyable – especially for nervous leaders, which in turn can build confidence in being on the sharp end.
Less opportunity for getting the rope behind their legs and risk falling upside down. I try to create a clipping position every time the foot is a little below the last clip. Rope awareness is often hard for people to think about – let alone fully understand – until after they have become comfortable leading.
More clipping practice.
Back-clipping mistakes become less of a factor when it’s not the case that each clip is crucial.
It can act as a gateway or introduction to trad climbing as people have the chance to see how trad gear works in practice, and often take an interest in how it works. They can become confident in the safety of well-placed gear.
Considerations when placing trad gear on sport routes
When adding trad gear between bolts, there are a few considerations to keep in mind:
It is best to place any extra gear on lead as the clipping positions and falls are easier to assess than when lowering. It is important to assess the consequences of the trad gear failing and the next piece or bolt holding the fall.
Gear needs to be bomb proof. Remember that you won’t have an inexperienced second trying to fiddle it out, so you can ‘weld’ them in and remove them yourself if necessary.
Pieces need to be placed with greater consideration for an outward pull. As lowering tends to have a greater outward pull than falling on a piece, use longer quickdraws than you might normally.
Consider keeping the first bolt clipped for the leader as this will reduce outward pull on any trad gear.
If multiple people are leading the same route, ask the climber to lower past each trad piece and while at head height unclip it from the rope carefully. It is best to not have the trad gear clipped if the next person will top rope the route – this reduces the risk of them forgetting to unclip the gear as they climb past which might dislodge it, making it unsafe for subsequent leads.
With the clips being closer together, climbers need to be reminded of the increased risk of “Z” clipping which also has the risk of dislodging gear.
Resting on trad gear should to be discouraged. People are used to resting on bolts while as close to them as possible, maybe even holding onto the draw while leaning back. When clients want to rest on trad gear, I encourage them to fall, to push on to the next bolt, or to climb down a few moves to rest on the bolt below.
Disadvantages of placing trad gear
The considerations listed above should help to ensure that the trad gear is well placed from the start till the end of the session to protect our clients and/or to give them a confidence boost. I will re-climb routes to check placements if I’m not sure. As well as the advantages of adding trad gear to sport routes, there are also some downsides:
Some people feel like they are cheating, not accepting the challenge of the route. I like to remind them that they are sport climbing. It is completely arbitrary what experience the route setter creates. One person might prefer to produce well bolted friendly experiences and another person develops routes that can feel more terrifying than a grit E5! Often the bolts on easy routes are spaced to save money, not because of some sort of ethical or adventurous approach. This can also be the case on older routes where the first ascensionist attempted to justify placing bolts by keeping things a little spicy! As the first ascent is rarely an onsight, this can be somewhat unfair for those that come after.
The extra protection will undoubtedly encourage some climbers to lead routes they would otherwise have declined. Failure of trad gear to hold a fall that results in injury could then be problematic from a liability standpoint. Clients should have accepted the risks involved with sport climbing but may have little or no understanding of trad climbing.
It is of course important to remember that independent climbers may also want to climb the routes that you have equipped. They may or may not appreciate the extra gear that you have placed? It is always advisable to explain the process and possible risks as you would to your clients.
Final words
Adding trad gear can serve as a psychological confidence booster and increases the safety of the client. I believe that with all considerations taken into account, the pros outweigh the cons by a large margin, so adding trad gear to sport routes has become standard practice for our team of coaches when climbing routes that are not adequately protected.
Of course, the sheer volume of people involved in the activity of climbing will cause the number of incidents to rise. It is apparent however that many near-misses and incidents would not have occurred with slightly adjusted systems. The BMC recently launched an incident and near-miss reporting system – any themes that emerge will be published in a summary report.
A few years ago, in response to an increase of near-misses and accidents at the crag, I found it necessary to produce a standard operating procedure for Rock and Sun Ltd. Interestingly, this document only applies to sport climbing. The UK system of teaching trad climbing is well-established, and the client usually arrives without the necessary skills to perform the activity and therefore is immediately open to learning. This is not necessarily the case with sport climbing, as most of the necessary skills can be practiced indoors.
Modern climbers less prepared for outdoor risk assessment?
Indoor gyms eliminate as much risk as possible, and rightly so for a professionally managed facility. Routes are well-bolted with clear fall zones. When indoor climbers make the transition to an outdoor environment the extra risks may not be obvious to all.
Climbers often arrive on our climbing trips having climbed 2 to 4 years indoors and already able to climb 6b+ or even 6c. Having practiced in a relatively safe environment can create a mismatch between the “hard skill” of the actual climbing and the “soft skills” of route finding, risk assessment and decision making. This mismatch can easily put a climber at risk, as it can be difficult to engage with softer skills when their (indoor) experience may point towards those skills being unnecessary.
I’ve certainly noticed that it has become more difficult to persuade an ever-greater number of clients to pay enough attention to safety while sport climbing.
A compounding factor is that people have become less capable of assessing and managing risk, as children and young adults have fewer opportunities to play and learn in an outdoor environment. This can lead to excessive or inappropriate risk-taking or to being overly cautious or nervous. Our client group is changing; they are not necessarily outdoorsy people. Many would not have chosen to become climbers had they not had the opportunity to learn in an indoor environment. To them the outdoor environment itself can present some challenges of its own. This is often displayed in having difficulty walking on uneven ground, struggling with the concept of going to the toilet outside, or not realising warm layers and waterproofs can be necessary in all climates.
Some typical examples of people’s inability to accurately assess risks, are:
Climber’s feet are at 1.5m from the ground, the first bolt is clipped and is about 2.5m (around chest height) and 1m to the right of the climber. Climber is about to move up and left. Question posed: look at where the bolt is and how much rope will be in the system if you move further away and then fall? Answer: I will swing down to the right – pointing in a diagonal line. Response: I remind them that when Newton invented gravity he designed it to pull you in a downward direction and that you will only start swinging after the rope is being weighted. In this case the climber would hit the ground without weighting the rope.
This is a familiar scenario, even after the preliminary training that happens at the start of a trip. We consistently teach people to read the rock when route finding: go where it is “less steep and more featured”, and before heading off on the chosen route to consider the prospect of a fall. If the fall is not safe or if they are in doubt, they should stay closer to the bolt even if the climbing is harder. It is apparent that many people are unable to assess the fall zone and struggle with visualising the physics involved. These awarenesses are not inherent and need to be learned.
On reaching the anchor after top-roping a diagonal line the climber tries to pull up rope. The anchor is out of sight so, as is standard, the rope is kept tight so that unclipping the anchor is not possible. I shout: why do you need slack? It is quiet for a few seconds then I hear: ok, lower. The client standing next to me while I belay asks what was happening and I explain that he was attempting to unclip from the anchor. She was horrified and expressed her surprise: how could anyone be so stupid! She then climbs, unclipping the draws as she goes. On reaching the anchor, she attempts to pull rope up. It is quiet for a second, then I hear “doh! Ok lower”.
This is a good example of how easy it is to not be doing a continual risk assessment every time we unclip our rope. At least 15 of our clients each year try to unclip themselves from the anchor after top roping and I know of several fatalities from this.
The fix is of course to always look at and assess what you are unclipping but using a locking karabiner and a quickdraw instead of two quickdraws on the anchor gives the climber something more difficult to unclip and allows time to think as well as a physical prompt that “this one is different”. This system provides something quick to clip into for a leader and ensures that anyone top roping cannot quickly unclip from the anchor. And of course, the rope should always be tight when the climber is out of sight and near the anchor.
When the first bolt is high, our standard practice is to have the rope preclipped for each leader. In this case, the climber pulled the rope down on several occasions over a couple of days. I spot this on each occasion and climb up to reclip the draw. Words are had! The following day, the same climber again pulls rope through first draw at 3m. This time I fail to spot this. He breaks a foothold while trying to clip the first draw and breaks his foot. Cause: Climber not equipped to assess the quality of the rock or the likelihood of falling off before the first clip.
Experience: Worst or Only teacher?
A friend of mine who runs an activity centre likes to say: “experience is the worst teacher”. Meaning that when we do something repetitively and the outcome is always positive, we can become complacent and neglect to assess the risk (same activity different setting). I understand that this sometimes catches people out, but I also think: “experience is the only teacher”.
I often think of a young trainee instructor of mine recounting a story of his near-death experience while out climbing with friends at a sea cliff in Pembrokeshire. He had decided to solo the last route of the day, only HS (well within his grade) while the other two rope climbed out. Near the top of the climb (about 90ft) and in the middle of the crux, he felt the rope he had tied onto this back (my rope by the way) untying from his waist. Realising that he was in no position to stop and re-tie he decided to climb carefully, hoping that the rope would not slip from his shoulders before reaching the top. Just as he felt the rope slip a little more, he looked down and realised that the rope would probably bounce off the ledge below and into the sea, as would he. The rope slipped, he instinctively let go of the rock with one hand to hold the rope. This caused him to barn door. He held the swing as his life flashed before his eyes. The next words he heard in his head was my voice telling him “I told you so”.
A few weeks before during a training session with the group of trainee instructors we had had a conversation about soloing. It was apparent to me that a certain individual was overly confident in his abilities and would come unstuck if not careful. I made the point that a great deal of climbing experience with a rope is necessary before even considering climbing without. The grade is not so much the issue, it is the unexpected things that can throw you off.
Common Mistakes leading to Improved Systems
“Everything that happens once can never happen twice. But everything that happens twice will surely happen a third time.” A quote attributed to the Brazilian author Paulo Coelho but I think is originally an Arabian proverb. As instructors we’re in the risk management business. It is impossible to remove risk completely in an adventurous activity and to do so would be detrimental to the experience. Where you can predict however that an incident will occur and there is an easy fix to avoid it, it would seem prudent to do so.
The following are example of changes that I’ve made both personally and for those that I teach:
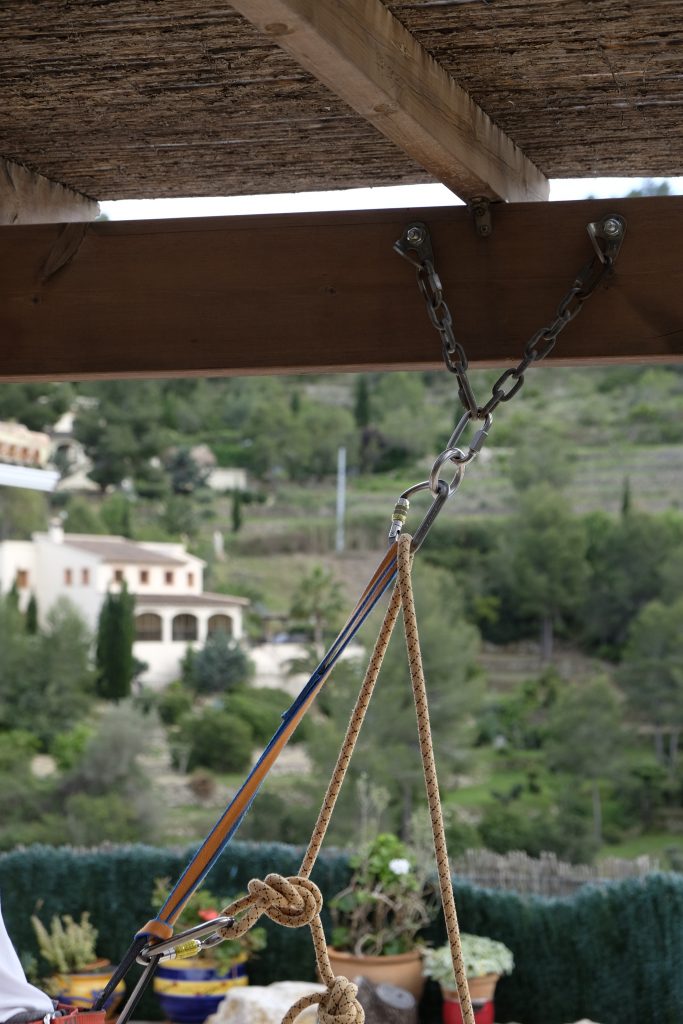
Swapping the quickdraw below the anchor onto belayer’s rope.
This can fix any mistake made while threading as long as the rope is still attached to the harness.
A good friend of mine with over 40 years of climbing experience recently made a mistake while cleaning a sport anchor that could have easily proven fatal but would not have been an issue if he was using the system that we insist our clients use. The mistake is common but is only usually a serious issue if having climbed the route on top rope: The climber passes the rope through the screw gate on their cows’ tail but fails to thread the anchor itself (see photo). If they then unclip their sling from the anchor without first testing the system there is nothing between them and the ground. I’ve witnessed this near-miss a few times. In one case the climber was desperately holding onto the anchor while the belayer was taking tight. With the rope pulling directly on the climber’s harness the climber shouted “no”, but the belayer was unable to work out what the problem was so kept taking in.
The climber made the mistake of threading their own screwgate instead of the anchor. Testing the system before unclipping the sling from the anchor, and swapping the last quickdraw onto the belayer’s rope prevent this mistake from being fatal. (photo taken at home because of Covid-19 lockdown restrictions)
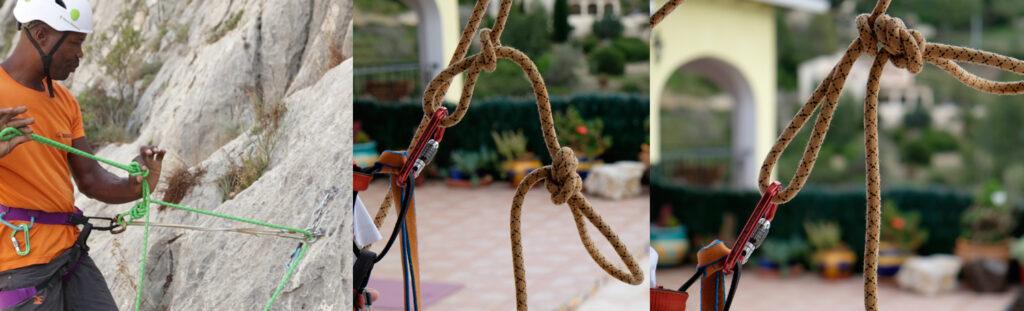
Tying a knot in the end of the rope close to the screwgate when cleaning anchors.
Client is being lowered from 30m and is around 5m from the ground when looking at the knot attached to the screw gate. Then, with a certain amount of alarm, says: “that doesn’t look right”. I figure there’s not much to be done but to continue to lower. On reaching the ground it’s immediately obvious that the client had tied a slip knot rather than a figure of eight or overhand on the bight. The client casually asks “what should I have done differently?” I offer a few expletives followed by “paid attention”! Clearly, they knew the knot was incorrectly tied as soon as they looked at it but had not bothered to check it after clipping to the screw gate and before trusting their life to it. Although I would hope to not to see this near-miss again the fix for this is a simple one that I now incorporate into my own threading system and fondly call it the “idiot knot”. It’s simply an overhand on a bight tied next to the screw gate to prevent the end slipping through (see photos or watch this video).
Left: Climber backs up his overhand knot with an idiot knot. Middle: Climber makes mistake of tying a slip knot, but backs it up with an idiot knot. Right: The slip knot only slips until the idiot knot, so a near-miss is prevented. (The middle and right photo taken at home because of Covid-19 lockdown restrictions)
Keeping a small Screwgate on Belay Loop as part of the cleaning set up.
This addresses two potential errors: (1) Attaching the rope to gear loop instead of belay loop. (2) Dropping the screwgate when moving it to the belay loop (problematic if you only know one method of threading). Watch this video.
After a couple days of making clear to the most experienced climber in the group that I was uncomfortable with him carrying the screw gate on his gear loop, because of the risk of clipping into this non-load-bearing part of the harness by mistake, he made it clear that this would be ridiculous. Next day, the client is threading an anchor 20m up while I’m lowering from a 40m pitch next to him. As I pass, I ask my belayer to stop lowering so that I can point out to the client that he threaded the anchor and attached the rope to his gear loop. He needed a near-miss to be persuaded to adopt our system.
Conclusion
As instructors we use our experience to make judgement calls. Systems that we have in place are built upon years of gained knowledge and experience.
While it is understandable that we all have different experience levels with making risk assessments and that each of us might assess risk or hazard differently, it is important to acknowledge that in our profession risk is always present and it is our job to reduce it as much as is reasonably possible.
During the past few years I’ve learned that at certain moments any of us are able to make mistakes that we would not normally think of as likely or even possible. It really doesn’t matter how long you’ve been climbing or how safety conscious or aware you might think you are, building some safety backups into your systems could just save your life someday. We can all make mistakes! Allow yourself to be open to adjusting your system based on your own or other’s experiences.
Published in Professional Mountaineer, Summer 2020
Climbing magazines, climbing videos on YouTube and climbers’ posts on social media are predominantly focused on redpoint ascents. The hardest routes in the world are redpoints, such as “La Dura Dura” (9B+/5.15c) sent by Adam Ondra as well as Chris Sharma in 2013, and “Silence” the first route of its grade (9C/5.15d) sent by Adam Ondra in 2017.
Redpointing is crucial to develop as a climber. It raises your overall climbing standard and allows you to climb much harder than when onsighting. This blog exlains how redpointing provides opportunities for learning and growth. It also describes what can be considered an effective redpointing process.
What is Redpointing?
Redpointing is lead climbing a route without falling or resting on the rope, having previously tried and failed to climb the route cleanly, either on toprope or lead. Before the successful redpoint, this process is also referred to as ‘projecting’, or trying a project.
The term redpointing originates from the mid 1970s, when German climber Kurt Albert recognised the potential of free climbing (as opposed to ‘aid climbing’) and started to free climb in his local area, the Frankenjura. While he was attempting to climb the route free, he would paint a red X on the rock near the pitons when he no longer needed these as aids, as handholds or footholds. Once he was able to climb the whole route without using any of the pitons, he would paint a red dot at the base of the route, to mark that he had achieved his goal of free climbing the route. This rot-punkt was translated to red-pointing. The concept of redpointing (as in: free climbing, not the idea of painting red dots on the rock) became very popular in the 1980s and 1990s with the increase of sport climbing worldwide.
Trevor Massiah climbing Morgan (7B+), Sikati Cave, Kalymnos, Greece (2017).
Some climbers never redpoint
Redpointing has become the most popular way to sport climb as people recognize its usefulness in raising their standards. That said, we work with hundreds of climbers a year and quite a few of them say they have never had a project, and never enter into a redpointing process. Instead, they choose to mainly focus on onsighting, which can be great (see our blog “How to improve your Onsight grade”), but in our opinion onsighting will inevitably result in the need for redpointing. If climbers pick the right challenge for themselves when aiming to onsight a route, then they will at some point fail their onsight. Rather than walking away and trying another route, this should be seen as a crucial opportunity for learning and improvement.
There are some good reasons (or excuses) to not enter into red-pointing. Climbers associate it with a fear of falling (and they will generally make more ‘air miles’ while redpointing than when onsighting). Redpointing can also be associated with a sense of failing, as by definition you are not getting to the top in one go. Also, redpointing can be mentally, emotionally and physically exhausting. If not careful, it may result in disappointment, frustration, dissatisfaction and/or tears. Many climbers therefore prefer onsighting: they would be less likely to fall (i.e. they experience less or no fear), and they get to the top in one go (i.e. they get the immediate reward).
So although onsighting is fun and probably the best thing to do when on a short climbing break in an area where you haven’t climbed much before, there are a lot of climbers out there, who just always try to onsight, and don’t ever allow themselves to redpoint – even if it is just turning a failed onsight into success by climbing it a 2nd or 3rd time.
The short-term gains and rewards of only ever onsighting don’t outweigh the long-term losses. What I mean is that by only onsighting climbers are not allowing themselves to get the most out of their climbing potential. They haven’t explored their limits. They are staying within the boundary of their ‘onsight-grade’.
Desiree Verbeek sending her project Memoria de Pez (7A+/7B) Tarbena, Costa Blanca (2018).
Why red point?
Redpointing should be part of everyone’s training. It is not something that is only for ‘good’ climbers. Every climber, beginner or advanced, can use redpointing to push their limits and increase their standards.
I differentiate here between a quick redpoint (about 3 attempts), and a longer redpoint process where you have chosen a proper project.
A quick redpoint should at least be done occasionally, after a failed onsight. Trying the route a second or third time, means you give yourself the opportunity to turn ‘failure’ into ‘success’. You will learn from whatever mistake you made on your first attempt; maybe you went the wrong way, maybe you ended up wrong-handed, maybe you missed a rest. Entering into a redpointing process, and spending more time on finding the correct route, or figuring out a specific crux sequence, means you will improve your route-finding skills as well as your problem-solving skills.
Redpointing a route that is significantly harder than anything you have climbed before comes with even more advantages. When I first try a route like this, thoughts enter my head such as ‘this is way out of my league’, ‘this is just impossible’, ‘I will never be able to climb this’, ‘this route is Chinese to me – I don’t understand any of it’. It is a very fulfilling process to slowly, step by step figure out how to climb it and turning the impossible into the possible.
When sending your project, it is very well possible that you won’t just do it by the skin of their teeth; it may well feel relatively easy! This is because during all those climbing sessions you got to know the route in a much more intimate way, and you figured out how to climb this route in the very best way, knowing that you need to get everything right in order for you to be able to climb this. You are increasing your movement repertoire (i.e. your personal ‘dictionary of moves’) and by doing these same moves over and over again, you are perfecting them and building muscle memory.
When you are sending the route it may feel like (and/or look like to other people at the crag) a dance up the rock. You are climbing the route with style, with poise, in a state of flow. Even though the route was too hard to start with, and didn’t allow you to get into a rhythm, once your technical ability and knowledge of the route matches the challenge of your project, you are likely to experience the well sought-after flow experience.
Entering into a long and demanding and challenging process also provides the opportunity to deal with failure. If you’re not falling, you’re not trying hard enough. If you want to get close to the best you can be, then climbing is largely about failure. You will fail more often than you succeed and you may as well (learn to) enjoy this process. Redpointing is a good way to get used to collecting more failures than successes. Plus, that one-time success makes up for all the failed attempts before it.
It also helps to redefine failure and success; failure is not having tried your best and/or not enjoyed your day, and success is having tried your best and/or being happy. Climbing is much more than touching the chains. Spending time outside, climbing and trying hard, falling off, solving the puzzle bit by bit (or even seemingly making no progress at all), sharing beta, and hanging out with your mates all make for positive climbing experiences.
Paul Cooke climbing “Johann” 6A+ on Lao Liang, Thailand (2017)
An effective redpointing process
It all starts with picking the right route. To ensure you set yourself the right challenge it would be a minimum of two grades above your usual onsight grade. Another thing to consider is the location of your project; it is more convenient to have a project close to home or in an area that you can go to at least a few times a year. When the gaps in between ‘tries’ are too big, you are more likely to lose progress made in the previous session. Thirdly, a route with good conditions would be ideal; for instance in the Costa Blanca it is nicer to have a project with afternoon shade than one with morning shade, because by the time you have warmed up your project could be in the sun (climbing in the sun is not conducive for good results most of the year in Spain). Last but certainly not least, pick a route that grabs your attention. An outstanding line or feature. A route that you really want to climb. A route that you don’t mind doing over and over, because you just love the moves on it.
Start climbing the route from bolt to bolt. If you can’t do a section in between bolts – or simply if you want to speed up the process and not waste too much energy, use a stick clip to clip the next bolt. In most cases, you can stick clip the whole route. Sometimes this may not be possible if the route goes over a bulge, or if a bolt is awkwardly placed and doesn’t allow the stick clip to get in. You can also use a stiff clip or panic draw to make it easier to clip the next bolt.
Now you have the rope up, toproping the route can be useful. You need to be careful though not to overdo it. You will need to understand the clipping positions and how exposed the gaps between the bolts may feel when on lead.
Lead the route bolt to bolt. Try to solve the puzzle section by section. When clipping the bolt, don’t say tight and wait for your belayer to take in. Instead, clip and let go (providing the fall is safe of course). This conserves energy rather than waiting for the rope to be taken in, and it is a useful falling practice at the same time.
While bolt-to-bolting, avoid the temptation to do the easier sections too quickly, because in the end all energy saved lower down will help you in the crux. Work the route and its rests until it feels absolutely right for your body/physique, until you’ve ironed out all inefficient moves.
Make sure to also repeat the section from the last bolt to the anchor! It is a common mistake people make to bolt-to-bolt every section many times, but then only do the finish once or twice, because they’re at the anchor now and think the bolt-to-bolting is finished. It is important to have those top moves wired; when bolt-to-bolting these moves may feel easy, but that could feel different when doing the route in a oner and arriving there completely pumped. You don’t want to fall off after all the cruxes and after pretty much having climbed the whole route, simply because you didn’t have the top moves wired.
Before it is time to consider trying the route, proceed to combining sections until you can climb the route from ground to the first rest, from the first rest to the second rest, etc, until the clipping of the anchor. When in the rests, which are usually near a clipping position, ‘practice the rest’ but then have a proper rest on the rope. Don’t just rest on the rock as you would be if you were in your redpoint attempt. Be disciplined, even when it is starting to feel easier.
A very important next step, and at the same time a good gauge of whether you are ready to start trying to send the route, is visualisation. Visualise yourself climbing the whole route, noticing every foot- and handhold, every rest and clipping position, every dynamic move, even where you will calm yourself back down by taking deep breaths. By the time you can visualise the whole route, you are very close to a clean ascent. Some people integrate visualisation with their meditation routine, or visualise just before falling asleep. It is also smart to visualise while you are getting ready to climb the route, and to continue visualisation while resting on the route. Visualisation is widely recognised as a very powerful tool in sports.
Climbing is a creative puzzle solving process that may require patience. A redpoint may take weeks or years. Adam Ondra for instance went to Flatanger 7 times in 2016 and 2017 for an average time of two or three weeks, and he reckons it took several hundreds of attempts before he climbed “Silence” (9C/5.15d).
Cheryl Law climbing “All Riggghht” 6B, Lao Liang, Thailand (2017)
A few years ago I coached Cheryl on her project, a beautiful >30m 6C in Thailand called ‘Family Affair’. We were both fully committed to her sending this route and the whole process was unforgettable for both of us. On every attempt, it was as if the whole world stopped, and it was just us there, silent, as if we were communicating through the rope. When she sent it, she said something that I since then like to remind myself and others of: She is a professional violinist and described the comparison of redpointing with studying a piece of music. When she first receives the music on paper it just looks like a jumble of notes, it looks impossible. Then bit by bit, line by line she starts to play the notes. Then she tries to play all the lines on the page. And she goes to the next page, trying to play every note. Until, after many hours of practice she is able to play the whole piece from start to finish. And, she said: and thát is when it starts! Because then you can play the piece again, but play it with feeling, play it the way it was meant by the composer. Not just as a succession of notes, but as a story. I love that analogy and feel that the same goes for climbing: there is a difference in climbing from hold to hold, and climbing as a dance up the rock.
Conclusion
Redpointing should be part of every climber’s training. It allows you to grow as a climber. It increases your movement repertoire, it improves your climbing grade, and it provides the opportunity to redefine ‘success’ and ‘failure’.
To those climbers who categorically avoid redpointing: it can easily be argued that red-pointing is easier than onsighting, both mentally and physically. There is the advantage of knowledge of the route. As opposed to onsighting, you know what’s about to come, you know the moves and how likely it is you are able to do them. You know that there are rests on the route and where and how good they are. You know where you are likely to fall off and what that fall will be like. Also, while practicing the route and working out the most efficient sequence in between every bolt, you’re only climbing from bolt to bolt and can then rest on the rope, to do the next section completely fresh, as opposed to onsighting where the pump may be building up. End the excuses: allow yourself to get the best out of yourself by (at least occasionally) engaging into a redpoint process.
If you would like to improve your climbing potential and learn how to redpoint you may want to consider joining Rock & Sun’s Performance Coaching Course. Most climbers come away from that week’s course having climbed two grades harder than they have done before, thanks to the combination of technique coaching and engaging in a redpoint process.