Tag: risk assessment

What to do when your rope isn’t long enough

This is a follow up article to “Watch your rope – why are people being lowered off the end of their rope”? There we described several things you should be doing to avoid not noticing that your rope is too short, long before the knot in the end comes into play. This you can find in Professional Mountaineer issue 29.

This article will look at what our options might be when you choose to climb a route that you know your rope is not quite long enough for, as well as what to do if you realise, too late, that your rope is not long enough.

On more than one occasion I’ve had to leave a cold beer over sunset on Tonsai beach and head up to Cat Wall (a steep wall above a narrow ledge 40 to 50m above the beach). A few of the harder pitches are long and if the last party on the crag had a rope only just long enough to reach the ground, but not the 10 or 12m extra necessary to throw and pull the climber back in, they would resort to whistling or shouting for help. A very easy situation to resolve if someone is willing to head up the trail to the ledge with a spare rope to throw and pull the climber back in. It’s an easy mistake but one that wouldn’t happen with a little forward planning for the length and steepness of route verses length of rope.

  • A knot in the rope removes the possibility of lowering the climber off the end of the rope but does not solve the problem of not having enough rope to reach the stranded climber. Alternatively, the belayer can be tied into the end of the rope: this also comes in handy for a couple of solutions that we will describe later.

What are your options if you would rather not buy beers all night for being rescued? A simple solution would be back clipping while being lowered to stay close to the rock, and the last climber leaving a biner or a maillon on a bolt far enough down the route to deposit you on the ledge. This would take some thinking ahead, because once the climber is too far away to reach the wall, this is not an option.

What to do when your rope is too short on a steep route

The most obvious thing to do to prevent situations like these is to choose routes that are short enough for the rope you have. But, if you’re set on climbing even though your rope is too short (your rope may also have been damaged limiting your options), bear these things in mind:

  • When threading anchors: tie back into the end of your rope to maximise length. Threading with a bight of rope can easily use 2m of rope. If you prefer the extra security of threading a bight of rope through the anchors and being attached to the rope before untying, then do so. But when you would normally be done, tie back into the end and then remove the bight.
  • When climbing steeply overhanging routes from a ledge as opposed to from the ground it is fairly standard to back clip (unclip the belayer’s side of the rope and clip your rope in) to ensure you lower back to the ledge rather than hanging out in space. Another solution would be for the belayer to toss the end of the rope to the lowering climber and pull them back into the belay ledge.

When your rope is too short for these suggestions to work, there are at least 5 solutions.

Solution 1 – Thread another anchor

  • Check for mid-point double bolt lower offs. These are often in place for routes of 40m or longer (sometimes 35m+ routes). While being lowered off the top anchor, stop at the mid-point anchor, clip in direct, and rethread the rope through this lower anchor to make it to the ground.
  • Essentially the same: Check for shorter routes nearby that you can swing across to and use as an intermediate anchor.


Solution 2 – Maillon(s) or leaver biner(s)

When there is no lower anchor to use, consider using a ‘leaver biner’ or maillon on a bolt lower down. Do consider the quality of the rock and condition of the bolt. Leaving gear on two consecutive bolts is an option if concerned. Please do not overtighten maillons, so they can be removed by a subsequent party – in some circumstances they can create leverage on the karabiner when clipping in front rather than behind the maillon. I’ve seen at least one karabiner failure due to this.

Maillon and leaver biner

Solution 3 – Prusik up the rope

When you can’t make it to the ground and have lost contact with the wall, prusiking up the rope to a point where you can contact the rock is of course an option – although not many sport climbers carry prusik loops with them on single pitch routes.

I once witnessed Crispin Waddy (one of the UK’s most accomplished adventure trad climbers) abseiling, until reached the end of his rope 20m from the ground. A very angry and concerned Heinz Zac (the famous Austrian climbing photographer) raced up a route to throw a rope to a very bemused Crispin who was already happily prusiking up his abseil rope using his shoe laces! Luckily, he wasn’t wearing Velcros. Of course, Crispin accepted the rope. I’m certain neither knew who the other was which amused me no end.


Solution 4 – Belayer climbs up to lower climber

When you know beforehand or realise while lowering that your rope is not quite long enough, this solution can work on routes that are not overhanging, if the belayer intends to follow the pitch after lowering the leader. The belayer ties into the end of the rope – preferably beforehand but it can also be achieved after locking off the belay device. Once the climber and belayer are counterbalanced, the belayer starts climbing – thereby lowering the other climber to the ground. If necessary, the belay device can be removed once there is enough slack in the system; the climber may need to clip in direct to a bolt to do this. It is not necessary to do this if you have more than one belay device. The previous climber can simply put the new climber on belay when there is enough slack. Up to this point the climber is protected by the person on the ground staying tied in. I’ve used this solution on many occasions, and it is often possible to judge that once the draws are cleaned from the pitch and the rope is running in a straight line, the climber will make it back to the ground on rope stretch – therefore this technique is less effective if the rope is more than a few metres under-length.

What to do when your rope is too short - Professional Mountaineer

Solution 5 – a spare rope (or slings)

What to do when none of the above solutions work, i.e. the climber is hanging in space so can not get to an intermediate anchor, nor re-thread a bolt by leaving a maillon, nor can he/she prusik up the rope?

I’ve used this on a couple of occasions when strangers at the crag have found themselves up to 5m plus off the ground and with a belayer who is unable to climb the route. The belayer steps backwards to retain the last metre or so and locks the belay device; the spare rope is attached to the end of the belay rope, and a belay device (or Italian Hitch) is fixed. Then, place a releasable prusik on the rope above the belay device and weight it to remove the belay device and transfer the tension to the added rope. The prusik can now be released and the climber lowered further – however, only until the knot hits the first runner – the limiting factor for this method. Alternatively, on occasion I’ve attached four 120cm slings and one 240cm linked together to the end of the rope, effectively lengthening the rope. The belayer clips into the end sling and the one closest to the rope. Once the prusik is removed the climber can be lowered using the belayer’s body as a counterweight, and unclipping from 1st to 2nd to the 3rd sling, until reaching the final sling and walking forwards until the climber is back on the ground. This is one to practice somewhere safe before trying in anger!

Summary: Preparation – Awareness – Carry

  • Preparation; how long is rope, how long is route, how steep is it? Knot both ends of the rope as standard practice.
  • Awareness; Keep an eye on the end of the rope. Look out for mid anchors, or lower stations on adjacent routes. When lowering off steep routes, stay in touch with the wall.
  • Carry maillons or leaver biners, slings and prusiks and know how to use them.
  • Last resort: call for help and buy the first round.


Words by: Trevor (MCI) and Desiree (RCI) Massiah are the Directors of Rock & Sun, who offer climbing courses and holidays in the UK, Spain, France, Greece, Italy, Morocco and Thailand, and bouldering trips to Fontainebleau
and Albarracin. Rock & Sun provide high quality coaching courses for all levels.

Photos by: Alun Richardson and Rock & Sun


Learning from Near-Misses

Are the number of climbing accidents increasing?

Of course, the sheer volume of people involved in the activity of climbing will cause the number of incidents to rise. It is apparent however that many near-misses and incidents would not have occurred with slightly adjusted systems. The BMC recently launched an incident and near-miss reporting system – any themes that emerge will be published in a summary report.

A few years ago, in response to an increase of near-misses and accidents at the crag, I found it necessary to produce a standard operating procedure for Rock and Sun Ltd. Interestingly, this document only applies to sport climbing. The UK system of teaching trad climbing is well-established, and the client usually arrives without the necessary skills to perform the activity and therefore is immediately open to learning. This is not necessarily the case with sport climbing, as most of the necessary skills can be practiced indoors.


Modern climbers less prepared for outdoor risk assessment?

Indoor gyms eliminate as much risk as possible, and rightly so for a professionally managed facility. Routes are well-bolted with clear fall zones. When indoor climbers make the transition to an outdoor environment the extra risks may not be obvious to all.

Climbers often arrive on our climbing trips having climbed 2 to 4 years indoors and already able to climb 6b+ or even 6c. Having practiced in a relatively safe environment can create a mismatch between the “hard skill” of the actual climbing and the “soft skills” of route finding, risk assessment and decision making. This mismatch can easily put a climber at risk, as it can be difficult to engage with softer skills when their (indoor) experience may point towards those skills being unnecessary.

I’ve certainly noticed that it has become more difficult to persuade an ever-greater number of clients to pay enough attention to safety while sport climbing.

A compounding factor is that people have become less capable of assessing and managing risk, as children and young adults have fewer opportunities to play and learn in an outdoor environment. This can lead to excessive or inappropriate risk-taking or to being overly cautious or nervous. Our client group is changing; they are not necessarily outdoorsy people. Many would not have chosen to become climbers had they not had the opportunity to learn in an indoor environment. To them the outdoor environment itself can present some challenges of its own. This is often displayed in having difficulty walking on uneven ground, struggling with the concept of going to the toilet outside, or not realising warm layers and waterproofs can be necessary in all climates.

Some typical examples of people’s inability to accurately assess risks, are:

  • Climber’s feet are at 1.5m from the ground, the first bolt is clipped and is about 2.5m (around chest height) and 1m to the right of the climber. Climber is about to move up and left. Question posed: look at where the bolt is and how much rope will be in the system if you move further away and then fall? Answer: I will swing down to the right – pointing in a diagonal line. Response: I remind them that when Newton invented gravity he designed it to pull you in a downward direction and that you will only start swinging after the rope is being weighted. In this case the climber would hit the ground without weighting the rope.

This is a familiar scenario, even after the preliminary training that happens at the start of a trip. We consistently teach people to read the rock when route finding: go where it is “less steep and more featured”, and before heading off on the chosen route to consider the prospect of a fall. If the fall is not safe or if they are in doubt, they should stay closer to the bolt even if the climbing is harder. It is apparent that many people are unable to assess the fall zone and struggle with visualising the physics involved. These awarenesses are not inherent and need to be learned.  

  • On reaching the anchor after top-roping a diagonal line the climber tries to pull up rope. The anchor is out of sight so, as is standard, the rope is kept tight so that unclipping the anchor is not possible. I shout: why do you need slack? It is quiet for a few seconds then I hear: ok, lower. The client standing next to me while I belay asks what was happening and I explain that he was attempting to unclip from the anchor. She was horrified and expressed her surprise: how could anyone be so stupid! She then climbs, unclipping the draws as she goes. On reaching the anchor, she attempts to pull rope up. It is quiet for a second, then I hear “doh! Ok lower”.

This is a good example of how easy it is to not be doing a continual risk assessment every time we unclip our rope. At least 15 of our clients each year try to unclip themselves from the anchor after top roping and I know of several fatalities from this.

The fix is of course to always look at and assess what you are unclipping but using a locking karabiner and a quickdraw instead of two quickdraws on the anchor gives the climber something more difficult to unclip and allows time to think as well as a physical prompt that “this one is different”. This system provides something quick to clip into for a leader and ensures that anyone top roping cannot quickly unclip from the anchor. And of course, the rope should always be tight when the climber is out of sight and near the anchor.

  • When the first bolt is high, our standard practice is to have the rope preclipped for each leader. In this case, the climber pulled the rope down on several occasions over a couple of days. I spot this on each occasion and climb up to reclip the draw. Words are had! The following day, the same climber again pulls rope through first draw at 3m. This time I fail to spot this. He breaks a foothold while trying to clip the first draw and breaks his foot. Cause: Climber not equipped to assess the quality of the rock or the likelihood of falling off before the first clip.


Experience: Worst or Only teacher?

A friend of mine who runs an activity centre likes to say: “experience is the worst teacher”. Meaning that when we do something repetitively and the outcome is always positive, we can become complacent and neglect to assess the risk (same activity different setting). I understand that this sometimes catches people out, but I also think: “experience is the only teacher”.

I often think of a young trainee instructor of mine recounting a story of his near-death experience while out climbing with friends at a sea cliff in Pembrokeshire. He had decided to solo the last route of the day, only HS (well within his grade) while the other two rope climbed out. Near the top of the climb (about 90ft) and in the middle of the crux, he felt the rope he had tied onto this back (my rope by the way) untying from his waist. Realising that he was in no position to stop and re-tie he decided to climb carefully, hoping that the rope would not slip from his shoulders before reaching the top. Just as he felt the rope slip a little more, he looked down and realised that the rope would probably bounce off the ledge below and into the sea, as would he. The rope slipped, he instinctively let go of the rock with one hand to hold the rope. This caused him to barn door. He held the swing as his life flashed before his eyes. The next words he heard in his head was my voice telling him “I told you so”.

A few weeks before during a training session with the group of trainee instructors we had had a conversation about soloing. It was apparent to me that a certain individual was overly confident in his abilities and would come unstuck if not careful. I made the point that a great deal of climbing experience with a rope is necessary before even considering climbing without. The grade is not so much the issue, it is the unexpected things that can throw you off.


Common Mistakes leading to Improved Systems

“Everything that happens once can never happen twice. But everything that happens twice will surely happen a third time.” A quote attributed to the Brazilian author Paulo Coelho but I think is originally an Arabian proverb.
As instructors we’re in the risk management business. It is impossible to remove risk completely in an adventurous activity and to do so would be detrimental to the experience. Where you can predict however that an incident will occur and there is an easy fix to avoid it, it would seem prudent to do so.

The following are example of changes that I’ve made both personally and for those that I teach:


  1. Swapping the quickdraw below the anchor onto belayer’s rope.

This can fix any mistake made while threading as long as the rope is still attached to the harness.

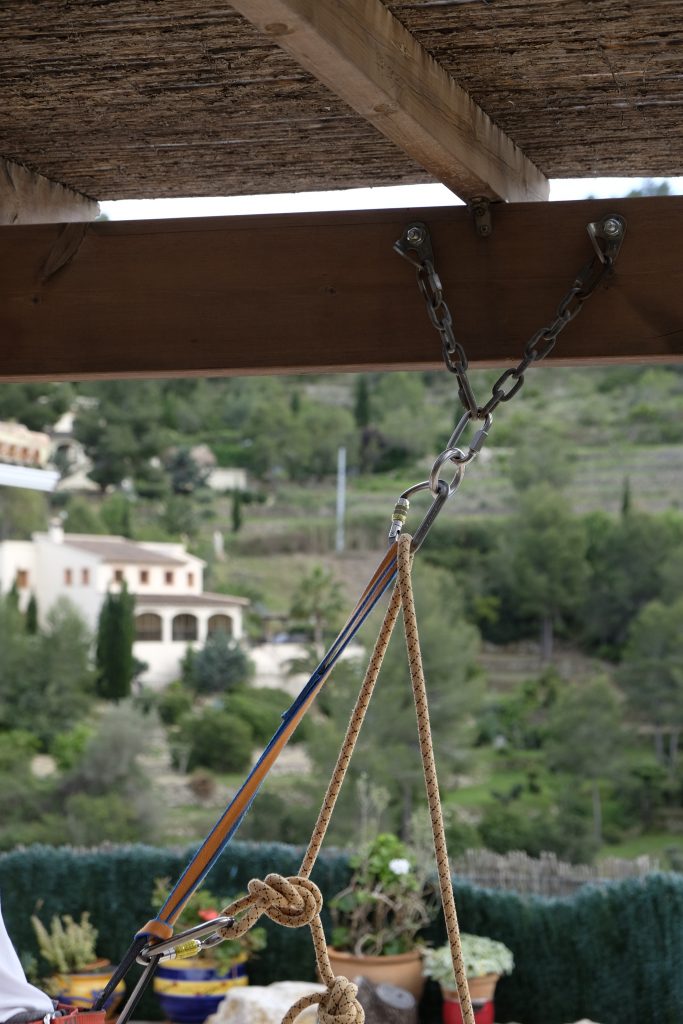
A good friend of mine with over 40 years of climbing experience recently made a mistake while cleaning a sport anchor that could have easily proven fatal but would not have been an issue if he was using the system that we insist our clients use. The mistake is common but is only usually a serious issue if having climbed the route on top rope: The climber passes the rope through the screw gate on their cows’ tail but fails to thread the anchor itself (see photo). If they then unclip their sling from the anchor without first testing the system there is nothing between them and the ground. I’ve witnessed this near-miss a few times. In one case the climber was desperately holding onto the anchor while the belayer was taking tight. With the rope pulling directly on the climber’s harness the climber shouted “no”, but the belayer was unable to work out what the problem was so kept taking in.

mistake: threading own screwgate instead of anchor
The climber made the mistake of threading their own screwgate instead of the anchor. Testing the system before unclipping the sling from the anchor, and swapping the last quickdraw onto the belayer’s rope prevent this mistake from being fatal. (photo taken at home because of Covid-19 lockdown restrictions)


  1. Tying a knot in the end of the rope close to the screwgate when cleaning anchors.

Client is being lowered from 30m and is around 5m from the ground when looking at the knot attached to the screw gate. Then, with a certain amount of alarm, says: “that doesn’t look right”. I figure there’s not much to be done but to continue to lower. On reaching the ground it’s immediately obvious that the client had tied a slip knot rather than a figure of eight or overhand on the bight. The client casually asks “what should I have done differently?” I offer a few expletives followed by “paid attention”! Clearly, they knew the knot was incorrectly tied as soon as they looked at it but had not bothered to check it after clipping to the screw gate and before trusting their life to it. Although I would hope to not to see this near-miss again the fix for this is a simple one that I now incorporate into my own threading system and fondly call it the “idiot knot”. It’s simply an overhand on a bight tied next to the screw gate to prevent the end slipping through (see photos or watch this video).

Threading anchors - Idiot knot
Left: Climber backs up his overhand knot with an idiot knot. Middle: Climber makes mistake of tying a slip knot, but backs it up with an idiot knot. Right: The slip knot only slips until the idiot knot, so a near-miss is prevented. (The middle and right photo taken at home because of Covid-19 lockdown restrictions)


  1. Keeping a small Screwgate on Belay Loop as part of the cleaning set up.

This addresses two potential errors: (1) Attaching the rope to gear loop instead of belay loop.  (2) Dropping the screwgate when moving it to the belay loop (problematic if you only know one method of threading). Watch this video.

After a couple days of making clear to the most experienced climber in the group that I was uncomfortable with him carrying the screw gate on his gear loop, because of the risk of clipping into this non-load-bearing part of the harness by mistake, he made it clear that this would be ridiculous. Next day, the client is threading an anchor 20m up while I’m lowering from a 40m pitch next to him. As I pass, I ask my belayer to stop lowering so that I can point out to the client that he threaded the anchor and attached the rope to his gear loop. He needed a near-miss to be persuaded to adopt our system.


Conclusion

As instructors we use our experience to make judgement calls. Systems that we have in place are built upon years of gained knowledge and experience.

While it is understandable that we all have different experience levels with making risk assessments and that each of us might assess risk or hazard differently, it is important to acknowledge that in our profession risk is always present and it is our job to reduce it as much as is reasonably possible.

During the past few years I’ve learned that at certain moments any of us are able to make mistakes that we would not normally think of as likely or even possible. It really doesn’t matter how long you’ve been climbing or how safety conscious or aware you might think you are, building some safety backups into your systems could just save your life someday. We can all make mistakes! Allow yourself to be open to adjusting your system based on your own or other’s experiences.

Published in Professional Mountaineer, Summer 2020

text: Trevor Massiah

The following blog describes more Common Mistakes and Improved systems