Climbing shoes need to be fit for purpose. As an outdoor climbing company, we work with climbers on their first outdoor climbing trip as well as with climbers who have been climbing for decades. Whether a beginner or a seasoned pro, we often experience that climbers don’t know much about their climbing shoes. And as a consequence are often not wearing the right shoe. The climbing shoes they come on an outdoor climbing trip with might be fine for indoor climbing, where footholds are relatively big and stick out from the wall. But the same climbing shoes don’t necessarily allow for standing on small edges, or using cracks.
In this blog we will give a quick guideline of what to look for when buying a good pair of Outdoor Climbing Shoes.
Stiff soles
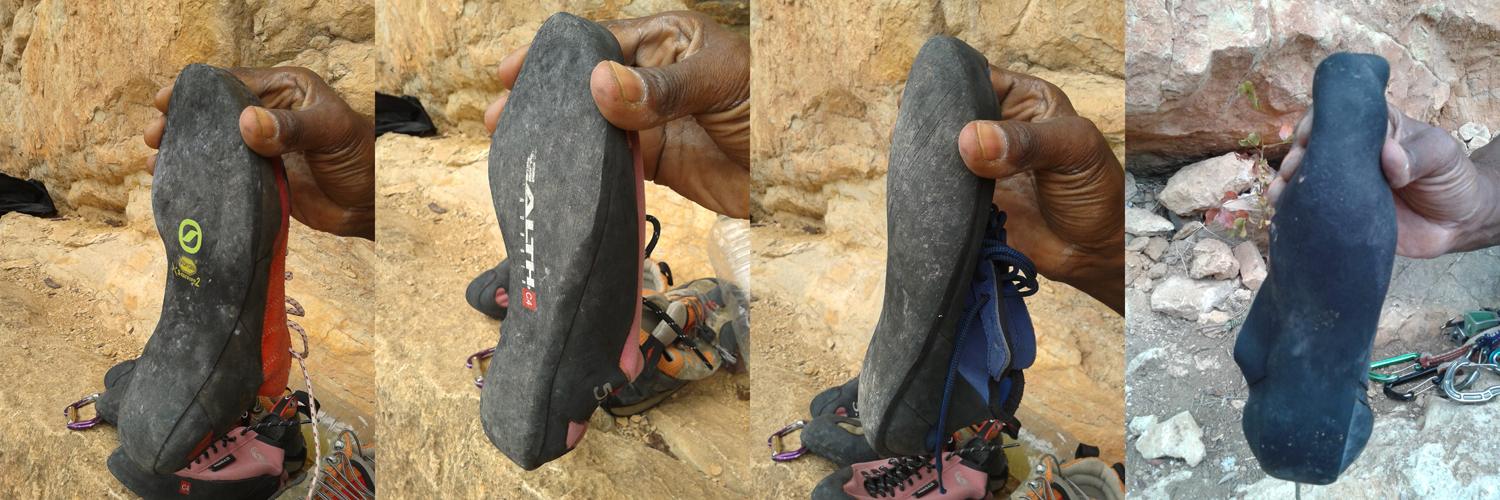
First of all it is important that the soles are stiff. This can be checked by squeezing the toe box of the shoe sideways. Use both hands in this squeeze test.
The stiffer the sole, the more support it gives the foot muscles when standing on small footholds. Wearing a shoe with a stiff sole allows the climber to place the toe area of the shoe on small edges without the foot rolling off the foothold – the toes being too weak to stand on the edge. A sloppy shoe will ‘roll off’ the foothold once it is weighted, unless the toe and foot muscles are strong enough to compensate for the softness of the shoe.
If you recognise the feeling of your toes ´getting pumped´ then that means your toes are having to work hard to compensate for the soft rubber and you need a stiffer pair of climbing shoes.
Besides the ‘squeeze test’, another guideline is the thickness of the sole. We recommend buying 4mm rubber. And when it is time to resole your shoes, replace them with 4mm or even 5mm. This has as another advantage that the shoe will last longer.
Another thing to take into account is the shape of the sole. For relative beginners, we recommend relatively flat soles, as opposed to the more arched shoes.
Toe box
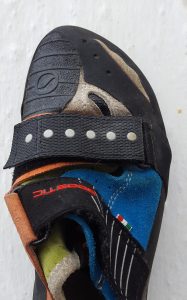
A former version of the Scarpa Boostic
Then there’s the toe box. We recommend shoes with a rubber toe box. The rubber maintains its shape, whereas leather stretches over time, as a consequence of which there’ll be room for movement of the toes. When the toes move around in the shoe, this makes it harder to stand on smaller footholds, because the toes will ‘roll off’ the foothold. What you want is a shoe with your toes snugly tucked together.
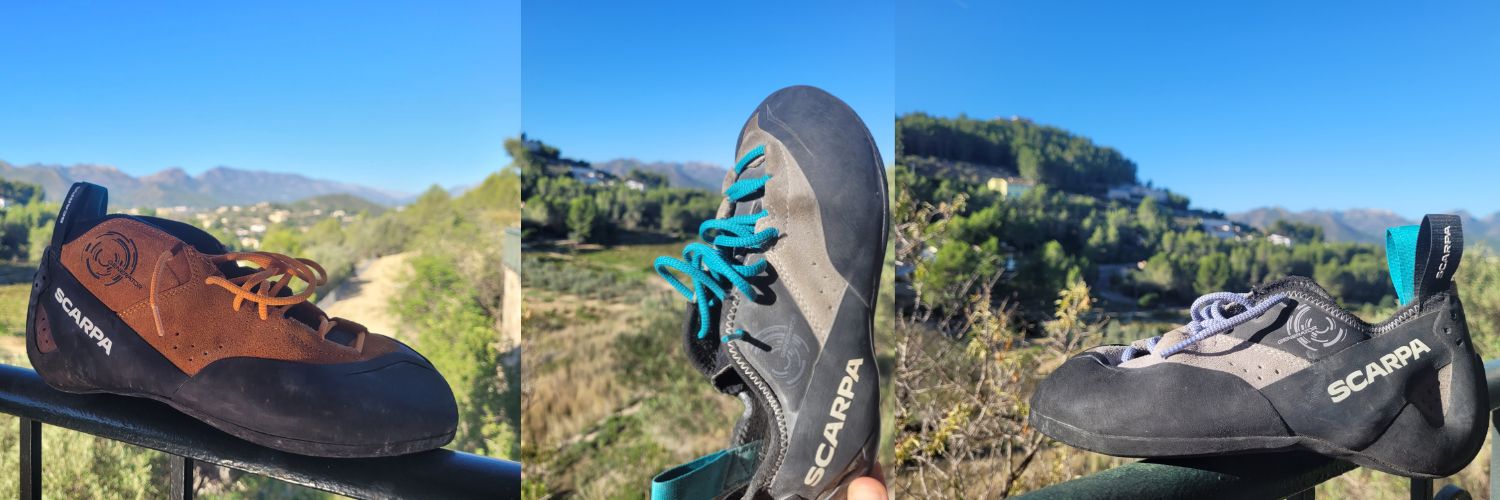
Scarpa
In our opinion, which is shared by some of the best resole companies, Scarpa is the leading brand for climbing shoes at the moment. The shoes are well-designed with high quality materials and maintain their stiffness longer than other brands. In the shop, a shoe from another brand may also feel stiff, but these lose their stiffness after only a few months of use, whereas the Scarpa shoes, with their high-level plastic insole, remain their stiffness even after several times of resoling.
The best outdoor climbing shoe on the market at the moment (2024) is the Scarpa Generator. The Scarpa Generator comes in ´male´ and ´female´ lace-ups (for wider and narrower feet), in velcro, and in ´mids´ that are higher and provide ankle protection – especially useful when crack climbing. To see where Scarpa position their Generator model in relation to their other models, please check this Scarpa website. Click here for more information on the technical features of the Scarpa Generator, and other models.
Scarpa Generators: Mid – Men’s – Women’s
**Rock & Sun is not sponsored by Scarpa**
Other considerations
Heavy or light climber? It may be a taboo to ask about a climber´s weight, but it is relevant in the decision of what shoe to get. A heavier climber puts more weight through the foot. More weight makes the shoe bend more, and therefore the foot muscles have to work harder. A heavier climber would therefore benefit from a stiff shoe even more so than a lighter climber does. A lighter climber can get away with a less stiff shoe as the stiffness of the sole isn´t put under as much pressure.
Strong or weak feet? It takes years of regular climbing for your foot muscles to get strong. As a rule of thumb, if you have been climbing less than 5 years, let´s say your foot muscles are still considered weak. In which case you would want the shoe to do the work for you, hence you would benefit from a stiff sole. Climbers with decades of climbing experience may get away with a less stiff shoe because their foot and toe muscles have become stronger.
Velcro or laces? That is pretty much a personal preference. Velcro is obviously quicker. Laces allow for a more specific fit of the shoe around your foot.
One or more pairs? We recommend having at least two pairs of climbing shoes. That can be an older, more comfortable pair, and a newer pair that is tighter and stiffer. Having (at least) two pairs means you can send one pair off to be resoled while you continue climbing with the other pair. It may seems expensive to begin with but is cheaper in the long run.
Resole or bin? We recommend resoling your climbing shoes. It is best to get this done before there is a hole in the front. By sending your shoes for resole on time, the resoler will be able to do a much better job, making your shoes as good as new. But what is ‘on time’? How to decide when to stop climbing in the shoe and send it to the resoler? Look at the front of the shoe and spot the line where the sole of the shoe meets the toe rand of the shoe. When these two parts of the shoe meet, it is time for a resole. Left: Beyond resole, ready for the bin. – Middle: Resole Now. – Right: No resole needed yet.
Important Note: Your climbing shoes should not be painful. Look for a stiff and comfortable pair.
Tip: use baby powder. It keeps the climbing shoe free from dirt, smell, and it makes it easier to get them on when your feet are a bit sweaty.
Although there is much more to be said about climbing shoes we hope this provides enough information to help you find better climbing shoes for outdoor climbing. For those of you coming on a Climbing Holiday in the Costa Blanca, Rock & Sun has a large collection of rental shoes there for you try out, test and compare with your own shoes before making your decision on which climbing shoes to buy next.
Strategy and a little bit of discipline are key ingredients to a successful day of climbing.
Far too often we see climbers arrive at the crag, full of enthusiasm and energy, with their goal for the day in mind. So keen to climb hard that day, that they don’t bother warming up. You can see them thinking (or sometimes we are lucky enough to overhear them say): “I think I can warm up on the route I finished on yesterday”, or “I don’t want to waste energy warming up and then be too tired to get the red point of my project”. So they start on something that is too hard for them to warm up on, which may lead to getting pumped, frustrated, or both.
Over the years we have realised that most climbers don’t think much about how to structure their climbing day. Some don’t realise how important warming up is. Some don’t know how to plan the day in such a way that they climb to the best of their ability by the end of it. And how are they supposed to know if nobody has given them advice on this?
This blog is all about how to structure your climbing day to get the best out of your body and mind.
Warm up.
Get your body and mind ready for the climbing day ahead. Climb a route that is very easy for you. A route that is well within your grade and don’t expect to fall off of or even get pumped. So you can just let the body move, not getting physically or mentally stressed. Climb it in your comfort zone the whole way up. Should things for some reason not feel easy for you during your first route: let go and sit on the rope.
Ego.
Our ego can get in the way of ourselves at this point. You don’t want to let go. You don’t want to ‘lose face’. You may even let the other climbers know “I climbed this without problems last time I did it”. You hold on and struggle on, your arms getting more and more pumped. You could of course have misread the guidebook and be on something harder than you intended.
Avoid Flash-Pump.
It’s called a flash-pump and it is very difficult to recover from. It may well stay with you all day. A warm up is what it is, a warm up. Get the blood pumping around your body with gentle movement like jogging or jumping. Lubricate the joints, activate the muscles. Don’t let your performance on the first or second climb affect your confidence. Don’t come to any conclusions about how you are going to climb that day based on how you climb the first few routes. If you felt clumsy, unfocused, tired, distracted or any other negative sensation, that is normal: you’re warming/waking yourself up. This is exactly why we warm up. To get that out of the way.
Fall.
We recommend to include some deliberate falls in your warm up routine. Letting go and practicing getting the landing right, releases the tension in the body and mind. Once we have experienced the apprehension before letting go and then the sensation of falling, we have reminded ourselves that we know how to fall and how to land. It relaxes you into the climbing. It stops you from over-gripping the handholds. It slows down your breathing. All of which help to increase the enjoyment (and performance) of your climbing. When doing fall practice on a regular basis, it has proven to be sufficient to do 2 or 3 Clip-and-Let-Go falls every time you go climbing. That hardly takes any time, and is extremely beneficial. Please read our blog “A fresh look at Fall Practice”.
Mileage.
Now we are ready for the main part of our climbing day.
As a rule of thumb, we aim to climb 6 routes in a day: 2 easy, 3 mid, 1 hard. And we rest at least 10 minutes in between every climb. This is increased to a 20 to 30 minute rest when we climbed to our max.
This rule of thumb can vary based on the aim for the day. If it is a day to do some climbing drills to improve your movement, then you would increase the volume. You would climb 10 routes, 8 of which easy where you can apply the drills, 1 mid where you incorporate the drills in the way you climb the route, and then 1 hard route where you can let the drills go out of the window and just try to climb the route as best you can but not worrying too much if you can’t hold your form.
If it’s a day of redpointing your project, then you may do 1 easy warm up route, 1 mid warm up route which includes some fall practice, and then move on to your chosen project. You could continue your warm up by bolt-to-bolting that route, or by stick-clipping your way up. Otherwise do something close to the grade of your project and if possible a similar style of climbing. Depending on how close you are to sending the route, the angle of the rock and how easy it is to bolt-to-bolt the route without falling into space and struggling to get back on: once you’ve reached the top, you could choose to toprope the route. And ego comes into play here again. Do no try to climb your project clean on toprope so you can say you’ve done it, or so you build confidence in your abilty to do it. It is smarter to hang or fall and repeat certain sections. Figure out the best sequences. Memorise the crux(es) of the route. And then your body is properly warmed up and you have all the knowledge in your head so you would then have a lead attempt.
Golden Standard.
Whether you are planning a day of ‘just going climbing’, onsighting, doing drills, or redpointing, we recommend that your climbing day meets the Golden Standard of 80:20. Where 80% of the session is practice and 20% is performance.
We wish you good luck in staying patient and in choosing discipline over ego, and hope you’ll experience the benefits of adding some structure to your climbing days. And don’t forget to have fun even when you fail.
Climbing is becoming ever more popular. Nowadays most climbers start indoors, in a bouldering gym or indoor climbing wall. And then at some point they will venture outside to do ‘the real thing’, climb on real rock. Sometimes we have seen this lead to friction between the behaviours of indoor and outdoor climbers. But how would they know about the unwritten rules of how to behave at a crag if nobody told them? In the old days most climbers were introduced to outdoor climbing by a friend who (knowingly or unknowingly) would have introduced them to the crag etiquette. As this is no longer the case for most climbers, we see it as our task as outdoor climbing instructors to do so.
There are some things that are good to know if you are making your first trip outdoors or if you are just unsure what is acceptable behaviour at the crag.
So let’s write down those ‘unwritten’ rules:
1. If your quickdraws are on a route but you’re resting, let someone else climb the route on your equipment.
2. Likewise, if you would like to climb a route that has someone else’s quickdraws on, ask if/when you could climb it. While climbing it, always check what you are clipping and that it is safe. I.e. are the draws in good condition, have they clipped the right bolts (this is especially important in Thailand when old bolts are next to new titanium glue-in bolts which should be the ones that are clipped).
3. If you are climbing in a large group, then offer another climber, who wants to climb a route your gear is on, a go when there is a gap in your group.
4. BUT, if you are the one to take up that offer, you are expected to be able to climb the route fairly quickly/efficiently. Not to hang all over it. Not to start bolt to bolting and red-pointing the route. It is also not considered ok to offer the route to others as this is not your call. You should ‘give’ the route back to the climbers who allowed you to climb it.
5. Be polite when asking for routes and when moving around each other at the crag. Remember that you are all there to enjoy the outdoors and the climbing. Don’t be afraid to ask others questions but do so nicely and possibly even start a conversation.
6. Don’t shout beta (guidance) without having asked if someone wants it. Most climbers want to figure out the moves themselves and would rather go the wrong way on a route, or use the wrong sequence instead of someone on the ground giving the beta. It is like someone telling you the plot of a movie before or while you’re watching it. Even when a climber has fallen off, and you know which holds they should use, you would still first ask whether they would like that bit of information or whether they want to figure it out for themselves.
7. Keep your stuff off the paths and try to avoid stepping on other people’s ropes, rope bags or mats.
8. Walk far away if you need the toilet and do not leave toilet paper behind, take it with you. Always carry a biodegradable plastic bag that you can put it in, which you can bin when you get back home. Further, leave no rubbish behind.
9. When you want to do something that will affect other climbers experience such as playing music or flying a drone, ask the other climbers if they are ok with that.
10. Last but not least, do not become the ‘crag police’ by telling people that certain holds are ‘out’. As long as people are being safe, having fun and being honest about what they did or didn’t manage to climb, there is no need to tell anyone that a certain hold does not belong to a route and therefore it is not the grade. Climbing outdoors does not have to be about climbing the route one specific way, with specific holds, as long as you are safe and having fun, that’s all that matters!
This is a follow up article to “Watch your rope – why are people being lowered off the end of their rope”? There we described several things you should be doing to avoid not noticing that your rope is too short, long before the knot in the end comes into play. This you can find in Professional Mountaineer issue 29.
This article will look at what our options might be when you choose to climb a route that you know your rope is not quite long enough for, as well as what to do if you realise, too late, that your rope is not long enough.
On more than one occasion I’ve had to leave a cold beer over sunset on Tonsai beach and head up to Cat Wall (a steep wall above a narrow ledge 40 to 50m above the beach). A few of the harder pitches are long and if the last party on the crag had a rope only just long enough to reach the ground, but not the 10 or 12m extra necessary to throw and pull the climber back in, they would resort to whistling or shouting for help. A very easy situation to resolve if someone is willing to head up the trail to the ledge with a spare rope to throw and pull the climber back in. It’s an easy mistake but one that wouldn’t happen with a little forward planning for the length and steepness of route verses length of rope.
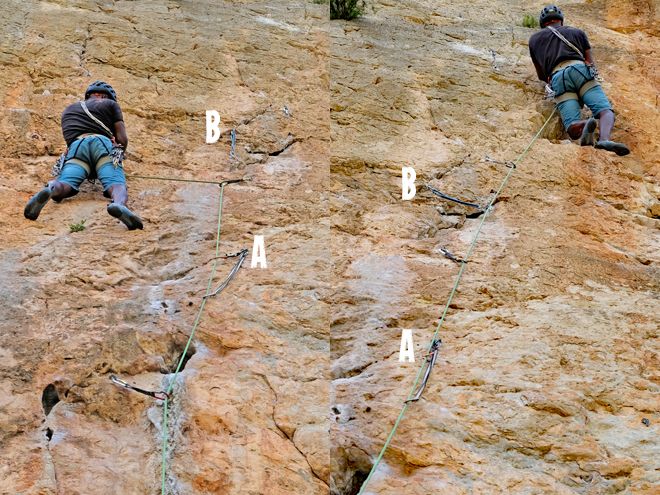
A knot in the rope removes the possibility of lowering the climber off the end of the rope but does not solve the problem of not having enough rope to reach the stranded climber. Alternatively, the belayer can be tied into the end of the rope: this also comes in handy for a couple of solutions that we will describe later.
What are your options if you would rather not buy beers all night for being rescued? A simple solution would be back clipping while being lowered to stay close to the rock, and the last climber leaving a biner or a maillon on a bolt far enough down the route to deposit you on the ledge. This would take some thinking ahead, because once the climber is too far away to reach the wall, this is not an option.
The most obvious thing to do to prevent situations like these is to choose routes that are short enough for the rope you have. But, if you’re set on climbing even though your rope is too short (your rope may also have been damaged limiting your options), bear these things in mind:
When threading anchors: tie back into the end of your rope to maximise length. Threading with a bight of rope can easily use 2m of rope. If you prefer the extra security of threading a bight of rope through the anchors and being attached to the rope before untying, then do so. But when you would normally be done, tie back into the end and then remove the bight.
When climbing steeply overhanging routes from a ledge as opposed to from the ground it is fairly standard to back clip (unclip the belayer’s side of the rope and clip your rope in) to ensure you lower back to the ledge rather than hanging out in space. Another solution would be for the belayer to toss the end of the rope to the lowering climber and pull them back into the belay ledge.
When your rope is too short for these suggestions to work, there are at least 5 solutions.
Solution 1 – Thread another anchor
Check for mid-point double bolt lower offs. These are often in place for routes of 40m or longer (sometimes 35m+ routes). While being lowered off the top anchor, stop at the mid-point anchor, clip in direct, and rethread the rope through this lower anchor to make it to the ground.
Essentially the same: Check for shorter routes nearby that you can swing across to and use as an intermediate anchor.
Solution 2 – Maillon(s) or leaver biner(s)
When there is no lower anchor to use, consider using a ‘leaver biner’ or maillon on a bolt lower down. Do consider the quality of the rock and condition of the bolt. Leaving gear on two consecutive bolts is an option if concerned. Please do not overtighten maillons, so they can be removed by a subsequent party – in some circumstances they can create leverage on the karabiner when clipping in front rather than behind the maillon. I’ve seen at least one karabiner failure due to this.
Solution 3 – Prusik up the rope
When you can’t make it to the ground and have lost contact with the wall, prusiking up the rope to a point where you can contact the rock is of course an option – although not many sport climbers carry prusik loops with them on single pitch routes.
I once witnessed Crispin Waddy (one of the UK’s most accomplished adventure trad climbers) abseiling, until reached the end of his rope 20m from the ground. A very angry and concerned Heinz Zac (the famous Austrian climbing photographer) raced up a route to throw a rope to a very bemused Crispin who was already happily prusiking up his abseil rope using his shoe laces! Luckily, he wasn’t wearing Velcros. Of course, Crispin accepted the rope. I’m certain neither knew who the other was which amused me no end.
Solution 4 – Belayer climbs up to lower climber
When you know beforehand or realise while lowering that your rope is not quite long enough, this solution can work on routes that are not overhanging, if the belayer intends to follow the pitch after lowering the leader. The belayer ties into the end of the rope – preferably beforehand but it can also be achieved after locking off the belay device. Once the climber and belayer are counterbalanced, the belayer starts climbing – thereby lowering the other climber to the ground. If necessary, the belay device can be removed once there is enough slack in the system; the climber may need to clip in direct to a bolt to do this. It is not necessary to do this if you have more than one belay device. The previous climber can simply put the new climber on belay when there is enough slack. Up to this point the climber is protected by the person on the ground staying tied in. I’ve used this solution on many occasions, and it is often possible to judge that once the draws are cleaned from the pitch and the rope is running in a straight line, the climber will make it back to the ground on rope stretch – therefore this technique is less effective if the rope is more than a few metres under-length.
Solution 5 – a spare rope (or slings)
What to do when none of the above solutions work, i.e. the climber is hanging in space so can not get to an intermediate anchor, nor re-thread a bolt by leaving a maillon, nor can he/she prusik up the rope?
I’ve used this on a couple of occasions when strangers at the crag have found themselves up to 5m plus off the ground and with a belayer who is unable to climb the route. The belayer steps backwards to retain the last metre or so and locks the belay device; the spare rope is attached to the end of the belay rope, and a belay device (or Italian Hitch) is fixed. Then, place a releasable prusik on the rope above the belay device and weight it to remove the belay device and transfer the tension to the added rope. The prusik can now be released and the climber lowered further – however, only until the knot hits the first runner – the limiting factor for this method. Alternatively, on occasion I’ve attached four 120cm slings and one 240cm linked together to the end of the rope, effectively lengthening the rope. The belayer clips into the end sling and the one closest to the rope. Once the prusik is removed the climber can be lowered using the belayer’s body as a counterweight, and unclipping from 1st to 2nd to the 3rd sling, until reaching the final sling and walking forwards until the climber is back on the ground. This is one to practice somewhere safe before trying in anger!
Summary: Preparation – Awareness – Carry
Preparation; how long is rope, how long is route, how steep is it? Knot both ends of the rope as standard practice.
Awareness; Keep an eye on the end of the rope. Look out for mid anchors, or lower stations on adjacent routes. When lowering off steep routes, stay in touch with the wall.
Carry maillons or leaver biners, slings and prusiks and know how to use them.
Last resort: call for help and buy the first round.
Words by: Trevor (MCI) and Desiree (RCI) Massiah are the Directors of Rock & Sun, who offer climbing courses and holidays in the UK, Spain, France, Greece, Italy, Morocco and Thailand, and bouldering trips to Fontainebleau and Albarracin. Rock & Sun provide high quality coaching courses for all levels.
Being comfortable with falling is crucial in order for people to be coached effectively. Being fully focused on the climbing itself without being overly fearful of falling leads to better quality practice and higher performance. Confidence in assessing the outcome of falling and knowing how to react also creates a safer climber. However, most climbers we work with either never practice falling, only practice indoors or do it so infrequently that it’s ineffective. Here we look at ways of making regular fall practice more accessible, fun even.
Why Fall Practice
Confidence in falling increases the chance of climbers trying what they consider to be low-percentage moves (see Figure 1 – orange arrows). Ultimately leading to them climbing closer to their potential.
Many climbers take an alternative route. By practicing moves, becoming technically proficient or fitter and stronger, climbers turn low-percentage moves into high-percentage ones (blue arrows), thereby reducing the likelihood of falling.
Staying within the comfort zone
Most of our clients have experienced fall practice at their local gym, only few have done so outside. The practice usually consists of taking a leader fall by jumping off with the feet above the last clip. Although intended to reduce the fear and to practice reacting correctly while falling and landing, for most people this is an unpleasant experience with few left feeling keen on repeating the experience regularly.
In recent years we have learned that it is possible to achieve the desired result without taking falls with the feet above the protection. It is important to work within the climber’s comfort zone, and gently push the edge of that a little further. Comfort zones differ from person to person, and can change on a daily basis. Explicitly aim to start with an exercise well inside the climber’s comfort zone and not push too far or too quickly as that is likely to result in an uncomfortable experience that they may then not want to repeat.
Some Practical Considerations
Of course it is not always safe to fall and falling is not simply a case of letting gravity take over. There are many things the climber and belayer can do to reduce the risk of injury. Safety when climbing involves dynamic or continual risk assessment. We all have different levels of spatial awareness and understanding of physics. For many it is important to experience falling regularly and in different situations to increase the ability to assess risk and act accordingly. Without this climbers may either be putting themselves at risk or be terrified when the consequences of a fall present little risk. With experience climbers are better able to assess how far they will fall and whether they are likely to come into contact with the ground, ledges, or other objects during the fall. Where it is not safe to fall, it may be appropriate not to commit to the moves, but reach for the clip stick, down climb or lower to the ground.
Executing a leader fall:
Look down at feet, land with soles of the feet.
For stability, keep feet shoulder width apart.
Cushion the landing by bending the knees as feet touch the rock
Grab the rope near the knot to avoid falling upside down
Climber doing “Clip and Let Go”-exercise to practice falling
How to do Fall Practice
There are several stages to start the process of fall practice. It is important not to move from each stage unless the climber has become comfortable with the exercise. Some climbers may not move beyond stage 1 – but can still experience huge benefits, some climbers may start at stage 5.
On toprope the climber simply practices bending the legs and pushing off, then bending the knees to cushion the landing as they swing back in with the soles of their feet. Increase the distance by pushing off harder and harder. When doing fall practice on toprope it is beneficial for the climber not to hold onto the rope but relax the arms.
The climber walks or runs sideways until they are comfortable with the inevitable pendulum this will create. Then move on to pushing out with their legs (as in the previous exercise) at the end of the pendulum creating a swing across the wall. This improves their skill of managing sideways falls and landings. We also aim to achieve a sense of fun and being more confident in their ability to manage a fall when sideways to the protection.
Toprope falls; on reaching each quickdraw, the climber touches it and jumps off immediately. The process is repeated at each quickdraw. The aim is to minimize the hesitation and assess how relaxed the climber is. The belayer needs to assess the appropriate amount of slack in the system from a safety perspective. As confidence increases the belayer can slowly increase the amount of slack in the system. Often simply announcing that there will be more slack, (even with the slack not actually there) will elicit a nervous response: a hesitation to let go upon touching the quickdraw, stiffening in the body, hands moving towards the rope, and/or an audible shriek while falling.
This stage is best done on lead and the climber should be at least 2 metres below the designated clipped quickdraw (with a safe fall-zone, ideally slightly overhanging and an appropriate distance up the route). Climber needs to choose a climbing position with 4 points of contact, and easy enough to hold so the exercise can be repeated a number of times. The climber should take three deep breaths, and on the 3rd breath out, push up from the legs, touch the rock as if going for a handhold and release. We are aiming for the climber to actively go for the move and then feel, look and even sound relaxed on the fall. The first falls should be with the minimum amount of slack. Once the climber is comfortable with that fall, increase the length of the fall by introducing more slack or dynamic belaying. This process can be repeated with the climber’s chin being above the quickdraw. Not having the rope in view is usually enough to elicit a greater stress response. This exercise could finish with the climber taking lead falls with the feet above the quickdraw. We find this to be rarely necessary. This exercise is particularly useful for breaking the cycle of freezing and eventually letting go which leader fall practice often promotes.
On lead, the climber clips each quickdraw, and then lets go. Variations in the fall are achieved by the belayer having more or less slack in the system – providing a soft catch where appropriate – and by the fact that naturally some clipping positions will be sideways to the protection. For this exercise it is obviously far more important that the belayer is skilled. This process carries a greater degree of risk. It is necessary to designate a starting clip from where to start the exercise, which may be the second or third quickdraw. From a safety perspective it is useful in this exercise for the climber to pause a second before letting go to check the clip has been made.
As mentioned, fall practice can start at any of these stages. Before moving to the next stage, ask the climber to give feedback and assess their body language. Some signs of fear or nerves: hesitation in letting go, stiffness or tension in the body especially the arms, or audible shriek while falling. In this form of ‘immersion therapy’ it is important to recognise when the climber is reaching their limit. The aim is to keep the sessions positive, even fun! Only move on to the next stage when both climber and coach agree that the climber is ready.
Climber doing “Clip and Let Go”-exercise to practice falling
Final Words
Our experience is that most climbers don’t even want to think about falling, let alone practice it. Others say they are not frightened of falling and therefore don’t need fall practice, despite displaying the obvious signs of fear. Without regularly experiencing or practicing falling, any original fear or apprehension tends to creep back in.
There is more to falling than just letting go.
With this fresh approach to fall practice, falling becomes something to be incorporated into every session, rather than being a stand-alone session. It also provides the climber with safe non-intimidating options that they are likely to continually practice. We have been genuinely surprised at having some of our most fearful clients actually requesting some form of fall practice at the start of a days climbing.
Published in Professional Mountaineer, Summer 2021. Words and photos by Trevor & Desiree Massiah
Placing trad gear between bolts can be an effective solution when struggling to find easy well-bolted routes for clients. Low grade routes can often be the worst to fall on due to the easy angled nature of the rock, making it far less likely that falls will be clean. Let’s face it, how often do we struggle to find well-bolted easy warm up routes? Bolts on these routes are often placed where the climbing is a little more difficult and the possibility of falling possible. This can often lead to long gaps where the first ascensionist may find it hard to imagine anyone falling but the consequences may prove to be serious. This can result in intimidating or terrifying first leads for clients.
Firstly, let’s look another option available to us before we look at the advantages of placing trad gear.
Using a sling or an alpine draw on the bolt can work well when the distance between bolts is not too long. This will bring the clipping position closer to the previous bolt (or ground) and is sometimes all that is necessary. When using this option, it is important to consider that we may have now created an unreasonable or unsafe gap to the next bolt. This can easily be solved by also clipping a standard length quickdraw onto the same bolt. This usually becomes essential when using a full-length sling to extend. Something that we need to be aware of though when using this method is that a high percentage of clients forget to clip the standard draw. This happens surprisingly frequently!
I’ve found that once people have clipped whatever is on the bolt, they tend to then focus on the next bolt. They will not necessarily pay attention to what else is on it when they get to within reach of the bolt itself. If working with a small group where it is possible to watch each climber closely enough to remind them as they pass the bolts, then this is fine – as long as they hear you and process your words. If working in larger groups where close supervision is not possible it can however present a real danger. For a number of reasons climbers may not be taking into account the distance between clips or be aware of the consequences of the fall (this can be even more problematic if any of these extended clips are out of view). When this occurs, we may have fixed one problem but created another.
It can be helpful to use a brightly coloured quickdraw that will stand out from the sling when you are using this method. A clear briefing on how to manage these clips is necessary but even then, the expectation should be that the distractions involved while climbing will cause a good percentage to forget. Therefore, I prefer to minimise the use of this technique if possible.
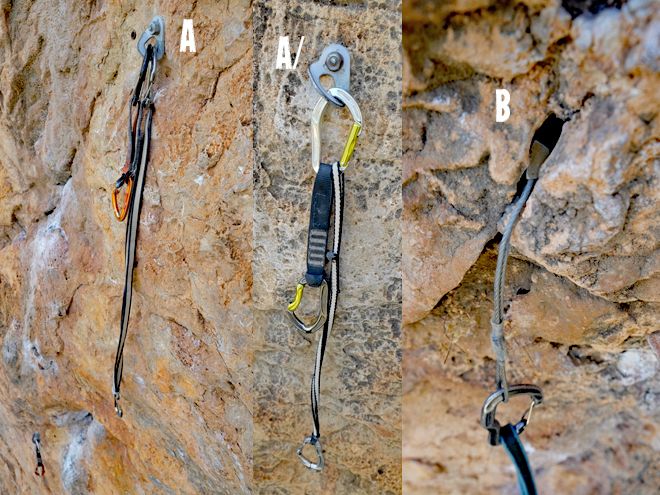
A, A/ Two ways of reducing distance between bolts. B Trad gear in between bolts
So, let’s look at the advantages of placing trad gear for your clients to clip:
Reduces the distance between clips: this can minimize the chances of sustaining injury when falling. It can also help make the experience of leading less stressful and more enjoyable – especially for nervous leaders, which in turn can build confidence in being on the sharp end.
Less opportunity for getting the rope behind their legs and risk falling upside down. I try to create a clipping position every time the foot is a little below the last clip. Rope awareness is often hard for people to think about – let alone fully understand – until after they have become comfortable leading.
More clipping practice.
Back-clipping mistakes become less of a factor when it’s not the case that each clip is crucial.
It can act as a gateway or introduction to trad climbing as people have the chance to see how trad gear works in practice, and often take an interest in how it works. They can become confident in the safety of well-placed gear.
Considerations when placing trad gear on sport routes
When adding trad gear between bolts, there are a few considerations to keep in mind:
It is best to place any extra gear on lead as the clipping positions and falls are easier to assess than when lowering. It is important to assess the consequences of the trad gear failing and the next piece or bolt holding the fall.
Gear needs to be bomb proof. Remember that you won’t have an inexperienced second trying to fiddle it out, so you can ‘weld’ them in and remove them yourself if necessary.
Pieces need to be placed with greater consideration for an outward pull. As lowering tends to have a greater outward pull than falling on a piece, use longer quickdraws than you might normally.
Consider keeping the first bolt clipped for the leader as this will reduce outward pull on any trad gear.
If multiple people are leading the same route, ask the climber to lower past each trad piece and while at head height unclip it from the rope carefully. It is best to not have the trad gear clipped if the next person will top rope the route – this reduces the risk of them forgetting to unclip the gear as they climb past which might dislodge it, making it unsafe for subsequent leads.
With the clips being closer together, climbers need to be reminded of the increased risk of “Z” clipping which also has the risk of dislodging gear.
Resting on trad gear should to be discouraged. People are used to resting on bolts while as close to them as possible, maybe even holding onto the draw while leaning back. When clients want to rest on trad gear, I encourage them to fall, to push on to the next bolt, or to climb down a few moves to rest on the bolt below.
Disadvantages of placing trad gear
The considerations listed above should help to ensure that the trad gear is well placed from the start till the end of the session to protect our clients and/or to give them a confidence boost. I will re-climb routes to check placements if I’m not sure. As well as the advantages of adding trad gear to sport routes, there are also some downsides:
Some people feel like they are cheating, not accepting the challenge of the route. I like to remind them that they are sport climbing. It is completely arbitrary what experience the route setter creates. One person might prefer to produce well bolted friendly experiences and another person develops routes that can feel more terrifying than a grit E5! Often the bolts on easy routes are spaced to save money, not because of some sort of ethical or adventurous approach. This can also be the case on older routes where the first ascensionist attempted to justify placing bolts by keeping things a little spicy! As the first ascent is rarely an onsight, this can be somewhat unfair for those that come after.
The extra protection will undoubtedly encourage some climbers to lead routes they would otherwise have declined. Failure of trad gear to hold a fall that results in injury could then be problematic from a liability standpoint. Clients should have accepted the risks involved with sport climbing but may have little or no understanding of trad climbing.
It is of course important to remember that independent climbers may also want to climb the routes that you have equipped. They may or may not appreciate the extra gear that you have placed? It is always advisable to explain the process and possible risks as you would to your clients.
Final words
Adding trad gear can serve as a psychological confidence booster and increases the safety of the client. I believe that with all considerations taken into account, the pros outweigh the cons by a large margin, so adding trad gear to sport routes has become standard practice for our team of coaches when climbing routes that are not adequately protected.
Of course, the sheer volume of people involved in the activity of climbing will cause the number of incidents to rise. It is apparent however that many near-misses and incidents would not have occurred with slightly adjusted systems. The BMC recently launched an incident and near-miss reporting system – any themes that emerge will be published in a summary report.
A few years ago, in response to an increase of near-misses and accidents at the crag, I found it necessary to produce a standard operating procedure for Rock and Sun Ltd. Interestingly, this document only applies to sport climbing. The UK system of teaching trad climbing is well-established, and the client usually arrives without the necessary skills to perform the activity and therefore is immediately open to learning. This is not necessarily the case with sport climbing, as most of the necessary skills can be practiced indoors.
Modern climbers less prepared for outdoor risk assessment?
Indoor gyms eliminate as much risk as possible, and rightly so for a professionally managed facility. Routes are well-bolted with clear fall zones. When indoor climbers make the transition to an outdoor environment the extra risks may not be obvious to all.
Climbers often arrive on our climbing trips having climbed 2 to 4 years indoors and already able to climb 6b+ or even 6c. Having practiced in a relatively safe environment can create a mismatch between the “hard skill” of the actual climbing and the “soft skills” of route finding, risk assessment and decision making. This mismatch can easily put a climber at risk, as it can be difficult to engage with softer skills when their (indoor) experience may point towards those skills being unnecessary.
I’ve certainly noticed that it has become more difficult to persuade an ever-greater number of clients to pay enough attention to safety while sport climbing.
A compounding factor is that people have become less capable of assessing and managing risk, as children and young adults have fewer opportunities to play and learn in an outdoor environment. This can lead to excessive or inappropriate risk-taking or to being overly cautious or nervous. Our client group is changing; they are not necessarily outdoorsy people. Many would not have chosen to become climbers had they not had the opportunity to learn in an indoor environment. To them the outdoor environment itself can present some challenges of its own. This is often displayed in having difficulty walking on uneven ground, struggling with the concept of going to the toilet outside, or not realising warm layers and waterproofs can be necessary in all climates.
Some typical examples of people’s inability to accurately assess risks, are:
Climber’s feet are at 1.5m from the ground, the first bolt is clipped and is about 2.5m (around chest height) and 1m to the right of the climber. Climber is about to move up and left. Question posed: look at where the bolt is and how much rope will be in the system if you move further away and then fall? Answer: I will swing down to the right – pointing in a diagonal line. Response: I remind them that when Newton invented gravity he designed it to pull you in a downward direction and that you will only start swinging after the rope is being weighted. In this case the climber would hit the ground without weighting the rope.
This is a familiar scenario, even after the preliminary training that happens at the start of a trip. We consistently teach people to read the rock when route finding: go where it is “less steep and more featured”, and before heading off on the chosen route to consider the prospect of a fall. If the fall is not safe or if they are in doubt, they should stay closer to the bolt even if the climbing is harder. It is apparent that many people are unable to assess the fall zone and struggle with visualising the physics involved. These awarenesses are not inherent and need to be learned.
On reaching the anchor after top-roping a diagonal line the climber tries to pull up rope. The anchor is out of sight so, as is standard, the rope is kept tight so that unclipping the anchor is not possible. I shout: why do you need slack? It is quiet for a few seconds then I hear: ok, lower. The client standing next to me while I belay asks what was happening and I explain that he was attempting to unclip from the anchor. She was horrified and expressed her surprise: how could anyone be so stupid! She then climbs, unclipping the draws as she goes. On reaching the anchor, she attempts to pull rope up. It is quiet for a second, then I hear “doh! Ok lower”.
This is a good example of how easy it is to not be doing a continual risk assessment every time we unclip our rope. At least 15 of our clients each year try to unclip themselves from the anchor after top roping and I know of several fatalities from this.
The fix is of course to always look at and assess what you are unclipping but using a locking karabiner and a quickdraw instead of two quickdraws on the anchor gives the climber something more difficult to unclip and allows time to think as well as a physical prompt that “this one is different”. This system provides something quick to clip into for a leader and ensures that anyone top roping cannot quickly unclip from the anchor. And of course, the rope should always be tight when the climber is out of sight and near the anchor.
When the first bolt is high, our standard practice is to have the rope preclipped for each leader. In this case, the climber pulled the rope down on several occasions over a couple of days. I spot this on each occasion and climb up to reclip the draw. Words are had! The following day, the same climber again pulls rope through first draw at 3m. This time I fail to spot this. He breaks a foothold while trying to clip the first draw and breaks his foot. Cause: Climber not equipped to assess the quality of the rock or the likelihood of falling off before the first clip.
Experience: Worst or Only teacher?
A friend of mine who runs an activity centre likes to say: “experience is the worst teacher”. Meaning that when we do something repetitively and the outcome is always positive, we can become complacent and neglect to assess the risk (same activity different setting). I understand that this sometimes catches people out, but I also think: “experience is the only teacher”.
I often think of a young trainee instructor of mine recounting a story of his near-death experience while out climbing with friends at a sea cliff in Pembrokeshire. He had decided to solo the last route of the day, only HS (well within his grade) while the other two rope climbed out. Near the top of the climb (about 90ft) and in the middle of the crux, he felt the rope he had tied onto this back (my rope by the way) untying from his waist. Realising that he was in no position to stop and re-tie he decided to climb carefully, hoping that the rope would not slip from his shoulders before reaching the top. Just as he felt the rope slip a little more, he looked down and realised that the rope would probably bounce off the ledge below and into the sea, as would he. The rope slipped, he instinctively let go of the rock with one hand to hold the rope. This caused him to barn door. He held the swing as his life flashed before his eyes. The next words he heard in his head was my voice telling him “I told you so”.
A few weeks before during a training session with the group of trainee instructors we had had a conversation about soloing. It was apparent to me that a certain individual was overly confident in his abilities and would come unstuck if not careful. I made the point that a great deal of climbing experience with a rope is necessary before even considering climbing without. The grade is not so much the issue, it is the unexpected things that can throw you off.
Common Mistakes leading to Improved Systems
“Everything that happens once can never happen twice. But everything that happens twice will surely happen a third time.” A quote attributed to the Brazilian author Paulo Coelho but I think is originally an Arabian proverb. As instructors we’re in the risk management business. It is impossible to remove risk completely in an adventurous activity and to do so would be detrimental to the experience. Where you can predict however that an incident will occur and there is an easy fix to avoid it, it would seem prudent to do so.
The following are example of changes that I’ve made both personally and for those that I teach:
Swapping the quickdraw below the anchor onto belayer’s rope.
This can fix any mistake made while threading as long as the rope is still attached to the harness.
A good friend of mine with over 40 years of climbing experience recently made a mistake while cleaning a sport anchor that could have easily proven fatal but would not have been an issue if he was using the system that we insist our clients use. The mistake is common but is only usually a serious issue if having climbed the route on top rope: The climber passes the rope through the screw gate on their cows’ tail but fails to thread the anchor itself (see photo). If they then unclip their sling from the anchor without first testing the system there is nothing between them and the ground. I’ve witnessed this near-miss a few times. In one case the climber was desperately holding onto the anchor while the belayer was taking tight. With the rope pulling directly on the climber’s harness the climber shouted “no”, but the belayer was unable to work out what the problem was so kept taking in.
The climber made the mistake of threading their own screwgate instead of the anchor. Testing the system before unclipping the sling from the anchor, and swapping the last quickdraw onto the belayer’s rope prevent this mistake from being fatal. (photo taken at home because of Covid-19 lockdown restrictions)
Tying a knot in the end of the rope close to the screwgate when cleaning anchors.
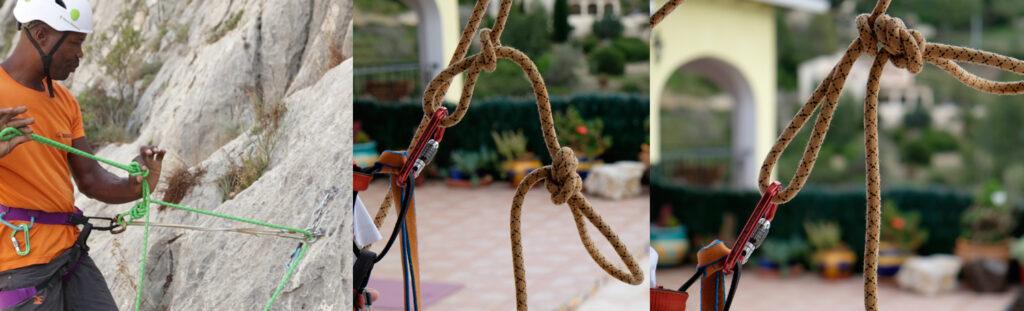
Client is being lowered from 30m and is around 5m from the ground when looking at the knot attached to the screw gate. Then, with a certain amount of alarm, says: “that doesn’t look right”. I figure there’s not much to be done but to continue to lower. On reaching the ground it’s immediately obvious that the client had tied a slip knot rather than a figure of eight or overhand on the bight. The client casually asks “what should I have done differently?” I offer a few expletives followed by “paid attention”! Clearly, they knew the knot was incorrectly tied as soon as they looked at it but had not bothered to check it after clipping to the screw gate and before trusting their life to it. Although I would hope to not to see this near-miss again the fix for this is a simple one that I now incorporate into my own threading system and fondly call it the “idiot knot”. It’s simply an overhand on a bight tied next to the screw gate to prevent the end slipping through (see photos or watch this video).
Left: Climber backs up his overhand knot with an idiot knot. Middle: Climber makes mistake of tying a slip knot, but backs it up with an idiot knot. Right: The slip knot only slips until the idiot knot, so a near-miss is prevented. (The middle and right photo taken at home because of Covid-19 lockdown restrictions)
Keeping a small Screwgate on Belay Loop as part of the cleaning set up.
This addresses two potential errors: (1) Attaching the rope to gear loop instead of belay loop. (2) Dropping the screwgate when moving it to the belay loop (problematic if you only know one method of threading). Watch this video.
After a couple days of making clear to the most experienced climber in the group that I was uncomfortable with him carrying the screw gate on his gear loop, because of the risk of clipping into this non-load-bearing part of the harness by mistake, he made it clear that this would be ridiculous. Next day, the client is threading an anchor 20m up while I’m lowering from a 40m pitch next to him. As I pass, I ask my belayer to stop lowering so that I can point out to the client that he threaded the anchor and attached the rope to his gear loop. He needed a near-miss to be persuaded to adopt our system.
Conclusion
As instructors we use our experience to make judgement calls. Systems that we have in place are built upon years of gained knowledge and experience.
While it is understandable that we all have different experience levels with making risk assessments and that each of us might assess risk or hazard differently, it is important to acknowledge that in our profession risk is always present and it is our job to reduce it as much as is reasonably possible.
During the past few years I’ve learned that at certain moments any of us are able to make mistakes that we would not normally think of as likely or even possible. It really doesn’t matter how long you’ve been climbing or how safety conscious or aware you might think you are, building some safety backups into your systems could just save your life someday. We can all make mistakes! Allow yourself to be open to adjusting your system based on your own or other’s experiences.
Published in Professional Mountaineer, Summer 2020
This blog “Common Mistakes and Improved Systems” is intended as supporting information for the article “Learning from near misses”, published in The Professional Mountaineer (summer edition 2020).
We hope that sharing near misses and incidents with instructors, guides and climbers might help avoiding the same experiences.
All of the incidents or near misses described here we have witnessed ourselves. Many of these are also recurring on the BMC incident and near miss reporting website. As these incidents or near misses have occurred on several occasions, we assume they will continue to happen.
In order to minimise the risk of them being repeated, we list these mistakes and offer ways of improving the systems and checks we do:
Not being tied into the rope
This happens surprisingly frequently. I got away with this one once but I know a few very experienced climbers who didn’t! The cause is always the same: the climber is interrupted or distracted while tying in. It is possible to distract yourself but it is usually your belayer or someone else passing you quickdraws, food, or something else.
Solution:
Always finish that particular job once started. If you have to do something immediately remove the rope from harness then start again.
Make a point to anyone who interrupts this process that it is one of the biggest no no’s in climbing. You should never interrupt the climber while tying in. Be a little bit rude as it aids the memory and makes the point.
Partner checks.
Falling upside down due to only being tied into leg loop section of harness
Solution:
Always tie down through the waist belt first, then the leg loop section of the harness. This way, even if climber only tied into one part, they will be less likely to invert because the waist belt is above their centre of gravity.
Partner checks.
1. Tie in by going down through the harness: waist belt first, then leg loops. 2. Correctly tied in. 3. If you got distracted and only tied into the waste belt, this is above your centre of gravity so you would fall upright.
4. By going up through the harness 5. if you get distracted and forget to also tie into the waste belt 6. you are only tied into the leg loops, thereby running the risk of flipping upside down when falling, because the knot is below your centre of gravity.
Assisted braking belay devices being incorrectly attached to the rope
Many of the assisted braking belay devices have no or little friction properties if the rope is not inserted correctly.
Solution:
Always engage and release the locking mechanism before the leader leaves the ground. This can be done by pulling up on the live rope to check the braking mechanism engages. Watch video
Partner checks. The climber should have seen this happen or ask the belayer to do this before setting off.
Never let go of the dead rope regardless of which device you are using.
Lock and release belay device before climber leaves the ground. 7. With one hand on the break rope 8. Or with both hands above the belay device. 9. If the device is threaded incorrectly, the belay device will not lock.
Belayer standing too far out from base of cliff
This in itself is not always inappropriate but it is a common mistake made when the climber is near the ground, i.e. usually below the 4th bolt.
The climber straddles the rope as they move sideways or they just have the rope between their legs as they move directly up past the 1st or second bolt. A fall in this position, with the belayer standing too far out, will almost certainly result in the climber falling with the rope between their legs then flipping upside-down, risking head injury. People usually get away with it, but this can result in very serious injuries.
When trad climbing, the belayer standing too far out is often the cause of trad gear failing. The angle of the rope pulls the gear in an upward direction and may pull it out.
When belayer is standing too far away from the rock when the climber is not very high yet, the force on the belayer can be surprising, especially if there is a weight difference. As the climber falls, the belayer is being pulled into the wall. This creates slack in the system, as a consequence of which the climber may hit the ground. This can be an issue usually until at least the 3rd bolt is clipped.
There is also the risk of the climber decking out due to the belayer getting injured while being pulled towards the rock (we’ve seen sprained wrists, cuts to hands and knees and a broken foot) and letting go of the rope. Risk of injury to belayer is greater if the first bolt is low. Unclipping the first bolt after the second bolt is clipped can help.
Solution:
Belayer should stay in close and slightly to the side of the climber until at least the 3rd or 4th bolt is clipped (this can vary from route to route). Certainly when trad climbing (but also sometimes with sport) I will ask permission from the leader before moving back. This is so the leader can assess the likelihood of the gear failing due to an upward pull. In extreme cases it is possible to unzip an entire pitch. The furthest I’ve seen a trad belayer sitting away from the base was at least 7m!
Belayer is spotting instead of belaying
This is an interesting one as it is something that happens increasingly: the belayer continues to spot even after the climber has clipped the first bolt. More commonly, the belayer spots the climber even though the first and/or second bolt was pre-clipped.
Solution:
As it can be nearly impossible to predict which clients will be guilty of this, it is best to not allow spotting when sport climbing. If the landing is bad or if the first bolt is high, have it pre-clipped.
Phantom clip
A phantom clip can happen with the quickdraw on the bolt and with the rope in the quickdraw. The cause is usually the same: Climber looks up to where to go next while clipping. The gate is pushed open and the rope is pinched between the gate and the nose of the karabiner. Occasionally it will fall out immediately and the climber might hear the click of the gate closing. If the rope is pinched it may either clip or unclip itself as the climber moves up. A few years ago we had a client who was repeatedly not clipped into the quickdraw. He was so bad at this that we asked him to routinely tug on the rope after each clip, which is something he is still doing several years on.
The same thing can happen with the quickdraw on the bolt. The gate pinches the bolt but isn’t actually inserted. The climber will often not notice that they are not clipped and continue to the next bolt.
Solution:
Make clients aware of the need to visually check the rope in the karabiner and gates closed before looking away.
A gentle tug on both ends of the rope can also help as physical feedback.
Incorrect use of belay glasses
Belay glasses can be a great aid in helping the belayer be more attentive as they allow them to be looking up constantly without developing neck problems. However, incorrect use of belay glasses results in poor or unsafe belaying. As the number of climbers using them increase, we see more and more near misses due to incorrect usage of belay glasses. They put the climber into a dangerous fall situation by having too much slack in the system. This occurs in several ways:
The belayer loses sight of the rope due to the glasses diverting their vision in an upward direction. It is vitally important to keep a close eye on the amount of slack in the system especially when the climber is close to the ground. They should only be used once the climber is a safe distance from the ground (usually the 3rd or 4th bolt). Looking up at a climber close to the ground does not affect the neck. Glasses balanced on the nose so the belayer can look over them seems like a good solution, but we often have to pick people up on having too much slack in the system at the start of the climb, even when they appear to be using them in this way.
When the climber pulls a lot of slack up to clip above their head. It’s common to see the belayer fail to react to the extra slack being produced as the climber then moves up to the bolt. Often leading to that much slack that the rope is on the ground. In some cases this is repeated on every bolt with the belayer never adjusting the amount of slack until the climber is moving above the bolt.
Belay glasses generally widen your field of vision. It is possible to watch a climber that is left or right of yours without moving your head. This can result in the belayer belaying for the wrong climber. As the person they are actually watching starts to clip they react by giving slack. This can obviously put the climber they are supposed to be belaying at risk. What we find interesting about this is that for us as instructors it’s a hazard of the job. When working with a group of six or more and most or all are leaders, we prefer to not be in the system belaying. A) So that we can immediately deal with problems that might occur. And B) We like to keep an eye out for mistakes that people might make. We have to be very careful not to make the same mistakes of belaying one client but also keeping an eye on the others. It’s easy to catch the hands wanting to react to the climber you are watching.
Another issue with belay glasses is that people forget to remove them when lowering. Belayers do not need to look up to know how fast they are lowering someone or to know when to stop if they are cleaning. It just takes a little thinking and communicating. The most important thing when lowering is to not lower your climber off the end of the rope. We religiously teach people to look down at the rope on the ground. Anything that makes this more difficult or less likely (such as wearing belay glasses) is a problem!
Solution:
Put belay glasses on after the 3rd This can be easily be done safely even without an assisted braking device: ask the belayer to stop after clipping. The bolt will almost certainly be above the waist so effectively they’re on top rope. Keep a hold of the dead rope or lock off the plate while you move them from your neck to your face. Of course, they can be rested on the end of your nose but I find too many clients still miss use them when doing this.
Teach the importance of looking down often and watching the rope. No extra slack until after the 3rd bolt or when it’s safe to do so and then a smile of rope half way between waist and knee but never below the knee.
It is more important to be ready to hold a fall than trying to react quickly to one that you are seeing already happening. Most people would not be able to react quickly enough if there is too much rope in the system or if they are standing in the wrong position.
It’s important to be aware of the temptation and problems with watching other climbers.
Remove them completely before lowering so that the rope length can be monitored.
Being lowered off the end of a rope
Being lowered off the end of a too short rope is something that is happening increasingly. I’m not going to go into too much detail here as I wrote an article on the subject for issue 29 of The Professional Mountaineer. Somehow the idea that when we are lowering a climber we need to watch them has taken over from what I had instilled in me when I started climbing, which was watching the rope. There are all sorts of things we can do to ensure our rope is long enough and we can of course routinely tie a knot in the end but even this has let people down. The one thing we can guarantee will work is watching the rope next to you as you lower (90% of the time the climber can also see this). Training yourself and your climbing partners to do this is of upmost importance.
Solutions:
Keep rope available to view i.e. not hidden in a rope bag.
Belayer and climber visually check rope while lowering even if there is a knot in the end.
Be aware of the route length as you climb and belay a route. If it feels like a nice long pitch the next question should by be: how long is our rope?
If you routinely tie a knot in the end don’t assume that it’s still there!
Climber being taken off belay when at the anchor
This happens for a variety of reasons, the most common being miscommunication, and is arguably the most likely cause of serious injuries:
We’ve seen this a few times and met at least one group of climbers at the crag who say they were taught to routinely take the climber off belay while threading then put them back on when they are ready to lower. We found watching this routine terrifying in case the climber forgot to check that they were on belay so politely insisted that they reconsider their system. After some initial resistance they were able to see how this might end in a serious accident and that it was unnecessary to take the climber off belay.
Probably the most common reason is miscommunication. British climbers are most guilty of this. When arriving at a sport anchor Brits routinely shout “safe”. This is mostly just out of habit. If they trad or multipitch climb the shout of safe is a reasonable one and generally means take me off belay. It is probably not the best thing to shout if they want their belayer to lower them at some point! Climbers need to carefully think about what the words they use actually mean. And need to realise that if they’re climbing with an unfamiliar partner who might be used to abseiling to save wear and tear on the anchors, they will be taken off belay. The belayer might just be distracted and on auto pilot as they would on a sea cliff, trad single pitch or grit stone outcrop (as they may have done thousands of times) and take the climber off belay upon hearing “safe”.
Overcommunication: What people who say “safe” when arriving at a sport anchor are trying to communicate is that they have made themselves safe with their PAS (personal anchoring system), sling and a screwgate in English, or cow’s tail for short. This is information that the belayer does not need. Belayers only need to know when climber wants slack, when you want a tight rope and when you want to be lowered.
Mishearing what was communicated or who was communicating. I’ve also seen a few climbers been taken off belay after their shout of “take” was misheard as “safe”. I’ve even stepped in when one climber is saying safe and the wrong belayer is taking their climber off belay. This can also happen in reverse; another climber shouts “safe”, the belayer thinks it is their climber shouting “take”, and almost pulls their leader off with a right rope.
Climber is at the top of a steep route that slabs out before the anchor so the belayer is out of sight. They thread the anchor then unclip their sling while holding the belayers side of the rope. They lower themselves down hand over hand, which is easy enough on easy angled rock, until it steepens and they can now see the base of the cliff. The belayer has taken them off to quickly go for wee! The belayer had assumed that the climber heard them when they shouted the information up that they needed to go.
After climbing a 50m pitch a climber stops at the mid-point anchor to rethread the anchor. After rethreading they unclip their cow’s tail and sit back on the rope before testing the system. They had forgotten that the belayer had to take in at least 20m of slack. In this situation, most people would take the climber off belay and put them on again, but luckily this belayer had kept the climber on belay. The climber fell at least 20m. The belayer was pulled up hard then landed on a jumble of rocks at the base of the crag and was in significant pain but no serious injury. The climber was very lucky – as was I. I was sitting next to the belayer getting ready to climb an adjacent route and am pretty certain the climber would have landed on top of me!
Solutions:
Only communicate what is necessary to limit misunderstandings.
Think carefully about the words you use: their meaning but also if they are likely to be misheard or confused for other words given distance, wind and any background noise.
Never unclip from the anchor unless your weight is being held on the rope “test the system”.
As a climber, holding onto the belayer’s rope until they are in view can be a useful addition when the angle changes severely as it can create large amounts of rope drag
As a belayer never take the climber off belay unless you are absolutely sure and/or can see it is safe to do so.
If your climber is out of view (when multi-pitching or when following a single pitch or if your climber will be abseiling rather than lowering from the anchor) consider paying out a few metres of slack if you are sure they have asked to be taken off. Only take the climber off when the slack is being taken too quickly for them to be climbing.
Climbing magazines, climbing videos on YouTube and climbers’ posts on social media are predominantly focused on redpoint ascents. The hardest routes in the world are redpoints, such as “La Dura Dura” (9B+/5.15c) sent by Adam Ondra as well as Chris Sharma in 2013, and “Silence” the first route of its grade (9C/5.15d) sent by Adam Ondra in 2017.
Redpointing is crucial to develop as a climber. It raises your overall climbing standard and allows you to climb much harder than when onsighting. This blog exlains how redpointing provides opportunities for learning and growth. It also describes what can be considered an effective redpointing process.
What is Redpointing?
Redpointing is lead climbing a route without falling or resting on the rope, having previously tried and failed to climb the route cleanly, either on toprope or lead. Before the successful redpoint, this process is also referred to as ‘projecting’, or trying a project.
The term redpointing originates from the mid 1970s, when German climber Kurt Albert recognised the potential of free climbing (as opposed to ‘aid climbing’) and started to free climb in his local area, the Frankenjura. While he was attempting to climb the route free, he would paint a red X on the rock near the pitons when he no longer needed these as aids, as handholds or footholds. Once he was able to climb the whole route without using any of the pitons, he would paint a red dot at the base of the route, to mark that he had achieved his goal of free climbing the route. This rot-punkt was translated to red-pointing. The concept of redpointing (as in: free climbing, not the idea of painting red dots on the rock) became very popular in the 1980s and 1990s with the increase of sport climbing worldwide.
Trevor Massiah climbing Morgan (7B+), Sikati Cave, Kalymnos, Greece (2017).
Some climbers never redpoint
Redpointing has become the most popular way to sport climb as people recognize its usefulness in raising their standards. That said, we work with hundreds of climbers a year and quite a few of them say they have never had a project, and never enter into a redpointing process. Instead, they choose to mainly focus on onsighting, which can be great (see our blog “How to improve your Onsight grade”), but in our opinion onsighting will inevitably result in the need for redpointing. If climbers pick the right challenge for themselves when aiming to onsight a route, then they will at some point fail their onsight. Rather than walking away and trying another route, this should be seen as a crucial opportunity for learning and improvement.
There are some good reasons (or excuses) to not enter into red-pointing. Climbers associate it with a fear of falling (and they will generally make more ‘air miles’ while redpointing than when onsighting). Redpointing can also be associated with a sense of failing, as by definition you are not getting to the top in one go. Also, redpointing can be mentally, emotionally and physically exhausting. If not careful, it may result in disappointment, frustration, dissatisfaction and/or tears. Many climbers therefore prefer onsighting: they would be less likely to fall (i.e. they experience less or no fear), and they get to the top in one go (i.e. they get the immediate reward).
So although onsighting is fun and probably the best thing to do when on a short climbing break in an area where you haven’t climbed much before, there are a lot of climbers out there, who just always try to onsight, and don’t ever allow themselves to redpoint – even if it is just turning a failed onsight into success by climbing it a 2nd or 3rd time.
The short-term gains and rewards of only ever onsighting don’t outweigh the long-term losses. What I mean is that by only onsighting climbers are not allowing themselves to get the most out of their climbing potential. They haven’t explored their limits. They are staying within the boundary of their ‘onsight-grade’.
Desiree Verbeek sending her project Memoria de Pez (7A+/7B) Tarbena, Costa Blanca (2018).
Why red point?
Redpointing should be part of everyone’s training. It is not something that is only for ‘good’ climbers. Every climber, beginner or advanced, can use redpointing to push their limits and increase their standards.
I differentiate here between a quick redpoint (about 3 attempts), and a longer redpoint process where you have chosen a proper project.
A quick redpoint should at least be done occasionally, after a failed onsight. Trying the route a second or third time, means you give yourself the opportunity to turn ‘failure’ into ‘success’. You will learn from whatever mistake you made on your first attempt; maybe you went the wrong way, maybe you ended up wrong-handed, maybe you missed a rest. Entering into a redpointing process, and spending more time on finding the correct route, or figuring out a specific crux sequence, means you will improve your route-finding skills as well as your problem-solving skills.
Redpointing a route that is significantly harder than anything you have climbed before comes with even more advantages. When I first try a route like this, thoughts enter my head such as ‘this is way out of my league’, ‘this is just impossible’, ‘I will never be able to climb this’, ‘this route is Chinese to me – I don’t understand any of it’. It is a very fulfilling process to slowly, step by step figure out how to climb it and turning the impossible into the possible.
When sending your project, it is very well possible that you won’t just do it by the skin of their teeth; it may well feel relatively easy! This is because during all those climbing sessions you got to know the route in a much more intimate way, and you figured out how to climb this route in the very best way, knowing that you need to get everything right in order for you to be able to climb this. You are increasing your movement repertoire (i.e. your personal ‘dictionary of moves’) and by doing these same moves over and over again, you are perfecting them and building muscle memory.
When you are sending the route it may feel like (and/or look like to other people at the crag) a dance up the rock. You are climbing the route with style, with poise, in a state of flow. Even though the route was too hard to start with, and didn’t allow you to get into a rhythm, once your technical ability and knowledge of the route matches the challenge of your project, you are likely to experience the well sought-after flow experience.
Entering into a long and demanding and challenging process also provides the opportunity to deal with failure. If you’re not falling, you’re not trying hard enough. If you want to get close to the best you can be, then climbing is largely about failure. You will fail more often than you succeed and you may as well (learn to) enjoy this process. Redpointing is a good way to get used to collecting more failures than successes. Plus, that one-time success makes up for all the failed attempts before it.
It also helps to redefine failure and success; failure is not having tried your best and/or not enjoyed your day, and success is having tried your best and/or being happy. Climbing is much more than touching the chains. Spending time outside, climbing and trying hard, falling off, solving the puzzle bit by bit (or even seemingly making no progress at all), sharing beta, and hanging out with your mates all make for positive climbing experiences.
Paul Cooke climbing “Johann” 6A+ on Lao Liang, Thailand (2017)
An effective redpointing process
It all starts with picking the right route. To ensure you set yourself the right challenge it would be a minimum of two grades above your usual onsight grade. Another thing to consider is the location of your project; it is more convenient to have a project close to home or in an area that you can go to at least a few times a year. When the gaps in between ‘tries’ are too big, you are more likely to lose progress made in the previous session. Thirdly, a route with good conditions would be ideal; for instance in the Costa Blanca it is nicer to have a project with afternoon shade than one with morning shade, because by the time you have warmed up your project could be in the sun (climbing in the sun is not conducive for good results most of the year in Spain). Last but certainly not least, pick a route that grabs your attention. An outstanding line or feature. A route that you really want to climb. A route that you don’t mind doing over and over, because you just love the moves on it.
Start climbing the route from bolt to bolt. If you can’t do a section in between bolts – or simply if you want to speed up the process and not waste too much energy, use a stick clip to clip the next bolt. In most cases, you can stick clip the whole route. Sometimes this may not be possible if the route goes over a bulge, or if a bolt is awkwardly placed and doesn’t allow the stick clip to get in. You can also use a stiff clip or panic draw to make it easier to clip the next bolt.
Now you have the rope up, toproping the route can be useful. You need to be careful though not to overdo it. You will need to understand the clipping positions and how exposed the gaps between the bolts may feel when on lead.
Lead the route bolt to bolt. Try to solve the puzzle section by section. When clipping the bolt, don’t say tight and wait for your belayer to take in. Instead, clip and let go (providing the fall is safe of course). This conserves energy rather than waiting for the rope to be taken in, and it is a useful falling practice at the same time.
While bolt-to-bolting, avoid the temptation to do the easier sections too quickly, because in the end all energy saved lower down will help you in the crux. Work the route and its rests until it feels absolutely right for your body/physique, until you’ve ironed out all inefficient moves.
Make sure to also repeat the section from the last bolt to the anchor! It is a common mistake people make to bolt-to-bolt every section many times, but then only do the finish once or twice, because they’re at the anchor now and think the bolt-to-bolting is finished. It is important to have those top moves wired; when bolt-to-bolting these moves may feel easy, but that could feel different when doing the route in a oner and arriving there completely pumped. You don’t want to fall off after all the cruxes and after pretty much having climbed the whole route, simply because you didn’t have the top moves wired.
Before it is time to consider trying the route, proceed to combining sections until you can climb the route from ground to the first rest, from the first rest to the second rest, etc, until the clipping of the anchor. When in the rests, which are usually near a clipping position, ‘practice the rest’ but then have a proper rest on the rope. Don’t just rest on the rock as you would be if you were in your redpoint attempt. Be disciplined, even when it is starting to feel easier.
A very important next step, and at the same time a good gauge of whether you are ready to start trying to send the route, is visualisation. Visualise yourself climbing the whole route, noticing every foot- and handhold, every rest and clipping position, every dynamic move, even where you will calm yourself back down by taking deep breaths. By the time you can visualise the whole route, you are very close to a clean ascent. Some people integrate visualisation with their meditation routine, or visualise just before falling asleep. It is also smart to visualise while you are getting ready to climb the route, and to continue visualisation while resting on the route. Visualisation is widely recognised as a very powerful tool in sports.
Climbing is a creative puzzle solving process that may require patience. A redpoint may take weeks or years. Adam Ondra for instance went to Flatanger 7 times in 2016 and 2017 for an average time of two or three weeks, and he reckons it took several hundreds of attempts before he climbed “Silence” (9C/5.15d).
Cheryl Law climbing “All Riggghht” 6B, Lao Liang, Thailand (2017)
A few years ago I coached Cheryl on her project, a beautiful >30m 6C in Thailand called ‘Family Affair’. We were both fully committed to her sending this route and the whole process was unforgettable for both of us. On every attempt, it was as if the whole world stopped, and it was just us there, silent, as if we were communicating through the rope. When she sent it, she said something that I since then like to remind myself and others of: She is a professional violinist and described the comparison of redpointing with studying a piece of music. When she first receives the music on paper it just looks like a jumble of notes, it looks impossible. Then bit by bit, line by line she starts to play the notes. Then she tries to play all the lines on the page. And she goes to the next page, trying to play every note. Until, after many hours of practice she is able to play the whole piece from start to finish. And, she said: and thát is when it starts! Because then you can play the piece again, but play it with feeling, play it the way it was meant by the composer. Not just as a succession of notes, but as a story. I love that analogy and feel that the same goes for climbing: there is a difference in climbing from hold to hold, and climbing as a dance up the rock.
Conclusion
Redpointing should be part of every climber’s training. It allows you to grow as a climber. It increases your movement repertoire, it improves your climbing grade, and it provides the opportunity to redefine ‘success’ and ‘failure’.
To those climbers who categorically avoid redpointing: it can easily be argued that red-pointing is easier than onsighting, both mentally and physically. There is the advantage of knowledge of the route. As opposed to onsighting, you know what’s about to come, you know the moves and how likely it is you are able to do them. You know that there are rests on the route and where and how good they are. You know where you are likely to fall off and what that fall will be like. Also, while practicing the route and working out the most efficient sequence in between every bolt, you’re only climbing from bolt to bolt and can then rest on the rope, to do the next section completely fresh, as opposed to onsighting where the pump may be building up. End the excuses: allow yourself to get the best out of yourself by (at least occasionally) engaging into a redpoint process.
If you would like to improve your climbing potential and learn how to redpoint you may want to consider joining Rock & Sun’s Performance Coaching Course. Most climbers come away from that week’s course having climbed two grades harder than they have done before, thanks to the combination of technique coaching and engaging in a redpoint process.