Climbing grades are source of much debate. Who decides what the grade of a route is? What makes a route a certain grade? In this blog we will answer the frequently asked questions about sport climbing grades.
When climbers come down off a route, very often the first thing they say is something about the grade. “It is definitely not a 5+, at least a 6A”. Which happens a lot in the Costa Blanca. Or “I would love to ‘take the grade’ but that clearly it is not a 7A, more like an easy 6C, maybe even 6B+”, which is more common on Kalymnos.
In an attempt to not get sucked into a discussion on numbers and talk about the route itself, we ask the climber: Ok, but did you enjoy it? Was it a nice route? Did you climb it well? Were there some good moves on it? Because what’s in a grade? Are you climbing to ‘achieve’ or ‘chase’ a number? Or are you climbing because you enjoy climbing, want to solve the puzzle the rock presents to you, and climb a route in a way that feels right or nice to you?
Who decides what the grade is?
The grade is given to a route by the person who climbs the route first, its first ascensionist. In most but not all cases, this is the person (or: are the people) who bolted the route.
Routesetters with a larger frame of reference are more likely going to be ‘correct’ with their grading. How many years have they been climbing outdoors themselves? How many routes have they bolted before? Do they set the grade after their own ascent, or do they wait giving it a grade until they have seen other people climb it? Not all route setters have this opportunity but for us that is an important element of grading. We often get asked (or overhear other climbers having conversations about lower graded routes) “how can they tell the difference between a 5, 5+ and 6A, when they climb 7s all the time”? Well, because of years of climbing experience, and years of working with clients climbing those grades.
A team of climbers from the indoor climbing gym in Switzerland, called Griffig, have recently developed a new crag on Kalymnos, equally named Griffig. Everyone we spoke with who climbed at this crag says that the routes there are overgraded by at least 1, sometimes even 2 or 3 grades. This may be in line with what we have noticed on other occasions, when outdoor routes are set and graded by people who mainly climb indoors, it feels harder to them and as a result the routes are likely to be overgraded. Climbing rock not being their main surface to climb on, their footwork and routefinding skills may therefore not be as developed as amongst people who climb outdoors a lot. The ‘outdoor climber’ may find an easier way, resulting in the downgrading of the route. The overgrading of Griffig may also be explained by possibly them being in a rush to finish this crag before the masses of climbers would turn up leading them to give estimated grades on some of the routes. Or, another explanation could be – and this is something we were informed of recently by people who have been on a ‘Route Development Course’ – they are advised to inflate the grade so the route becomes popular. Well, that definitely did the trick for Griffig!
That brings us to the second part of the answer to “who decides what the grade is?”. After the routesetters or first ascensionists have graded a route, the vote goes to the outdoor climbing community. On websites such as UKClimbing climbers log the routes they have climbed, and leave their feedback on the grade they think it is. For a route graded 7B+ in the guidebook, you would get for instance 5 votes for “mid 7B+”, 11 votes “low 7B+”, 20 votes “high 7B”, 32 votes “mid 7B”, and 18 votes “low 7B”, then there would be a reasonable amount of doubt cast on the original grade and a route may get downgraded to 7B.
You can assume that for established routes that have been developed a few years ago and climbed by many people since that the grade is settled.
Which factors influence the grade?
The grade of a route serves as an indication of what difficulty to expect. It is not an exact science with a formula that can be applied to any route, in which case everyone applying that formula would get to the same grade as a result. However, there are of course objective things that route developers and climbers take into account when grading a route (not necessarily in order of importance):
1. The hardest move on the route. If you have a 32m route that is 5 all the way except for one 6B move, then it has to be graded 6B, otherwise a ‘5-climber’ would be deceived into thinking they would be able to climb the route. So a route has to be graded for its hardest move.
2. How many hard moves. The next thing to take into account is how many hard moves there are, more specifically, how many hard moves in a row. A route can be a ‘one move’ crux, or it can be very sustained, with many moves of a certain difficulty in a row, or it could have several cruxes instead of one, but with good rests in between. If a route has a one 6B move crux, it would be a 6B. Does it have a longer sequence of multiple 6B moves in a row, then the overall grade is likely going to be 6B+. Does a route have multiple 6B cruxes but for instance the angle of rock allows the climber to have good rests in between, then 6B remains the fair grade.
3. Length of the route. Similar but slightly different, is the length of the route. Is stamina needed for a 40m pitch or is it all over in 12m? A 12m 6B most likely has a harder technical crux than a 40m 6B of which the hardest move may be 6A+ but the extra grade is given to reflect that one has to be focused and on one’s feet for much longer.
4. The equation of the size of the holds, the spacing of the holds, the angle of the rock, and the friction of the rock. (read more below – Anecdote: size of holds)
5. The area where the route is. Every climbing area has its own history. Routes are graded in relation to existing routes. This means that within a climbing area, the grade gives an indication of how hard a route is compared to its neighbour. But often it does not work to compare one-on-one for routes in different areas. Some areas even become less popular because grades there are hard, and people allow themselves to be disappointed that they are not able to climb the grade they would climb elsewhere, and have to drop down a grade or two in this area. Climbers do like the ego-boost of climbing in areas where the grades are ‘softer’.
Anecdote: Size of holds. “The footholds are too small to call this a 5”. One of our clients said exactly this about Awesome (Pena Roja, Lliber) and it opened an interesting discussion, leading to a better understanding of the debate around grades. If what the client said is true, then how small can footholds be to give a route a certain grade? If there is one section on the route where the footholds are 1cm2, does that make the route a 7A? Just because you aren’t usually ‘forced’ to use small footholds on a 5? And if we were to grade routes for the size of the footholds, would there be a standard like in clothing where different cm’s equal different sizes XS/S/M? For instance foothold size >5cm2 = F3, 4-5 cm2 = F4, 3-4cm2 = F5, 2-3cm2 = F6, 1-2cm2 = F7, etc? We don’t think a system like that would hold up, as the difficulty of the move is an equation of the size of the holds, the spacing of the holds, the angle of the rock (A small foothold on a slab can be a great foothold), and the friction of the rock. Think of a crux sequence of a route, with a certain set of holds and the distance these are from each other, but then tilt the angle of rock a little bit, or reduce the friction, and it’s easy to understand that size alone doesn’t matter. It really is the overall technical difficulty of a move. And to come back to the route this client commented on, many of our clients who can climb F5 but can’t climb F6A, are able to stand on these small footholds, on this angle of rock, with its friction and the availability of handholds, and complete the climb.
Anecdote: Guidebook. Sometimes a route description in the guidebook will say “…, harder for short people”. This makes us laugh. Are we moving to a situation where a route is 6C for the strong, 6B for those with good technique, 6C+ for short people? Where does it end? The grade should refer to the route, not to the skills or physical characteristics of those who climb it. Which moves us onto..
Make the route the grade
Route reading and route finding are crucial as the grade refers to the easiest way to climb this route. Some routes are harder to read than others. Did you not climb it the easiest way, then you may have turned a 6C into a 6C+ or 7A. That’s why climbers shouldn’t really say much about the grade of a route when they have climbed it once. They should say something like “the way I climbed it, it felt like a … to me”. That way the climber acknowledges that they may not have gone the exact easiest way, may not have found all the hand- and footholds, may not have climbed it with the most efficient hand- and feet sequences.
Anecdote: New Beta. While bolt-to-bolting La Bella 7B at our local crag (Pena Roja, Lliber), having failed to execute the several ways I had seen other climbers do the crux moves, I hung on the rope – again. I thought I was never going to be able to do it this way. I looked around to see where the rock from this to the next bolt is less steep for my feet and then I noticed a line of feet going out left. And there are some handholds out left as well. I reckoned: It is less steep, the fall is clean, and this crux sequence ends on the same hold as the more common crux sequences. But later, while I was sending the route going left at the crux instead of going over the bulge, the locals sitting at the bottom of the crag said – loud enough for me to hear – “she’s going off route, it’s not 7B that way”. I am fine with that. I am happy to have found a nice and easier way to climb this route and if ‘my way’ is 7A+ then that’s great.
We will soon publish an article about Routefinding on our website or in a climbing magazine.
Grade for the onsight or for the redpoint?
Although that seems a simple either-or question, in reality the answer lies somewhere in the middle. Is it a route where the routefinding is obvious, a route that is easy to read? It is likely that people will find the crux hand- and footholds? Then a route is not much harder to onsight than it is to redpoint. But is it a route with several sequences that are difficult to see or figure out while onsighting, then it seems fair to us to grade for how hard the route feels without previous knowledge. It is commonly accepted that a redpoint is easier than an onsight. We think it is fair to grade for the onsight for routes that are within climbers’ onsighting capabilities. Within the climbing community, many climbers can onsight up to about F8A/+. When you go beyond that, it makes sense to grade for the redpoint as there aren’t many climbers attempting to onsight those routes.
Anecdote: Grace. There’s a route called Grace (7A) at Chong Phli in Thailand. The local climbers for years have been saying that it is actually only a 6C+. But we agree with its original grade, having climbed the route with many of our clients and therefore having been able to use them as our frame of reference. Grace is a rather sustained route with multiple cruxes. If you don’t find the best holds, or don’t climb the best sequence in either of these sections, it certainly feels harder (less stable on the feet, more relying on the arms) than it does to the local climbers who spend no time looking for holds or working out sequences. Once a climber has bolt-to-bolted and redpointed Grace, and quite literally is able to climb it Grace-fully, it could feel like a 6C+. But to get to that stage, a lot of effort needs to be put in, which we would argue justifies it being graded 7A. Onsight Grace feels more like 7A+. As a redpoint it could be a 6C+.
Final remarks
A grade in a guidebook is quite literally a guidance. The purpose of grading routes is to give the climber an idea of what is available to them from one crag to the next, and to choose the climbing experience they would like to have. Climbers roughly know their warm up grade, their onsight grade, and their redpoint grade. When going to a new area, jump on a couple of easy route first to see how the grading fits with other climbing areas you have been to, so you can pick the right challenge for yourself on that given climbing day.
Of course, talk about and discuss grades as much you like but our advice is: do not let it become your main focus point or main aim. Don’t allow yourself to be disappointed by a grade or it being the only thing you have to say about a climb. Don’t reduce a climb to its number. Enjoy the route. Enjoy solving the puzzle it presents you. Enjoy the moves. Enjoy your climbing.
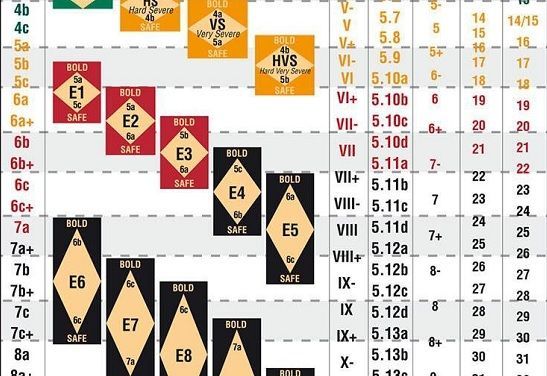
*For reference to those who climb in areas that don’t use the French grading of sport routes, please see below the Climbing Grade Conversion Table made by Rockfax*


